|
T 84 GEARBOX
REPAIR MANUAL
- ASSEMBLY -
- John Barton -
Transmission Assembly Part 1
I have photographed and reassembled a transmission..
There are too many photo’s- so I’m going to have to break it up
I should have covered this first part with my last post..
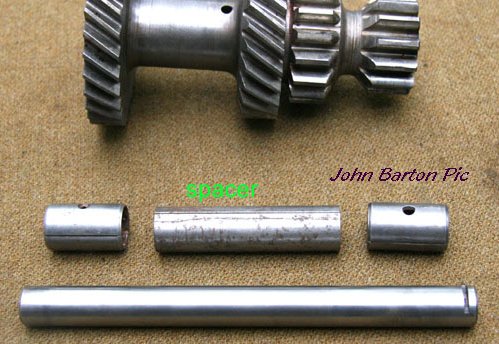
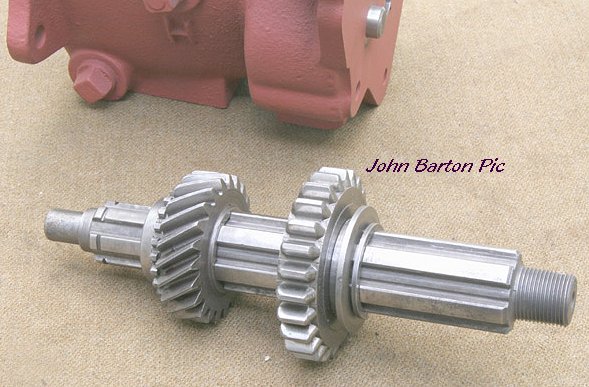
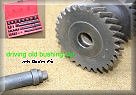
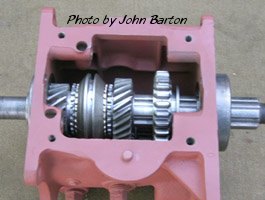
first thing to assemble is the countershaft gear.. and there are several pieces involved.
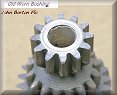
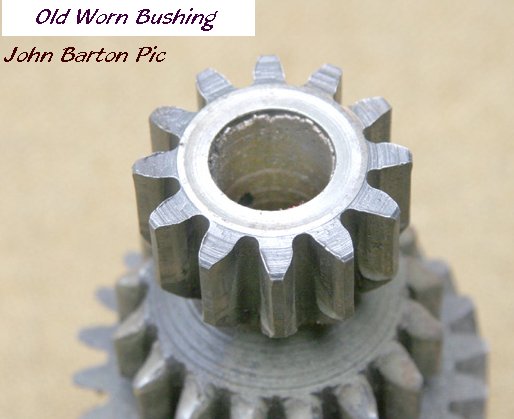
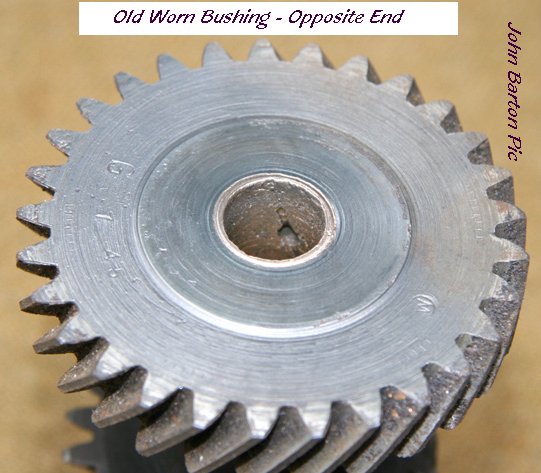
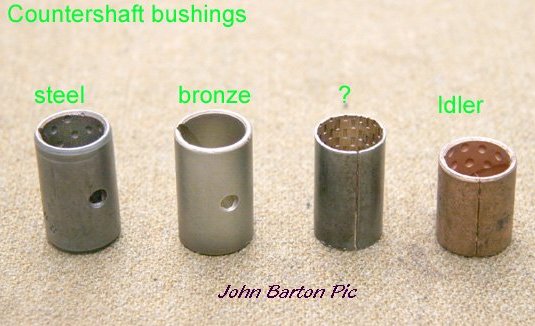
Old Worn Bushing,
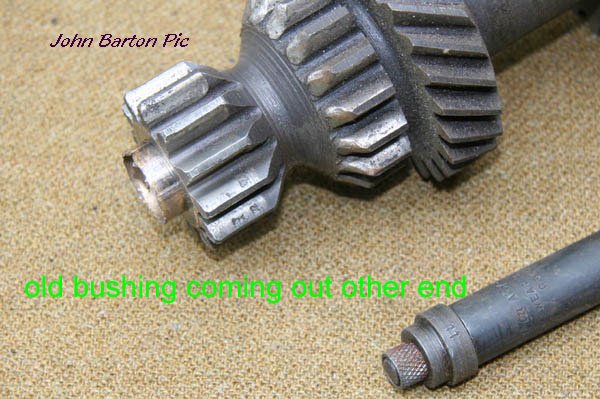
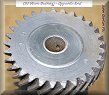
Opposite end, Driving Bushing Out, Bushing partially out.
The front end is a little better, but both bushings
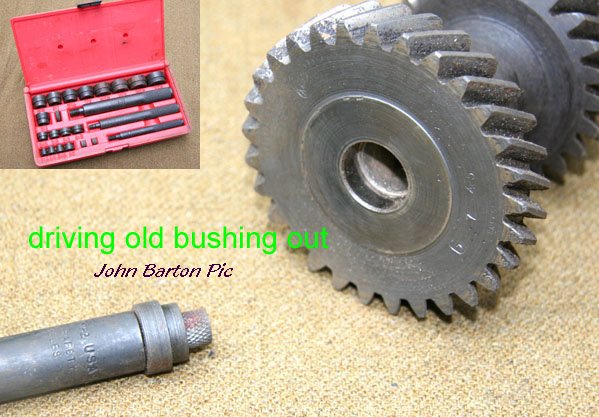
and the spacer need to come out. I use a bushing driver from a set with different sizes.. others
are needed when working on the jeep.. so the set paid off.. just drive from one end,
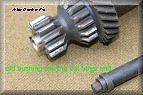
And bushings and spacer will come out. Putting them in is just the
opposite.. same driver,
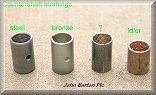
The above pics shows some
of the different types of bushings I’ve come across.
Some slide in countershaft gear.. some need driving,
Some need to be reamed, some don’t.. I have seen different
Combinations.. it depend on what you get when you buy them.
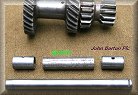
Pic of countershaft, bushings and spacer, and countershaft
gear.. (above)
I do not know if it is a Ford/Willys thing there are holes in gear.. and holes in
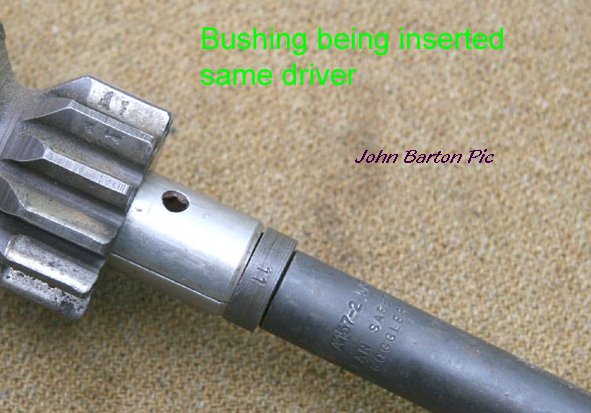
bushings. They do not need to be lined up. I use the same driver to
insert.. ( Left below pic) one in one end, spacer from other side, and then 2nd
bushing.. I have used an expandable reamer..
 and I have taken the assembled gear to a machine shop for reaming,
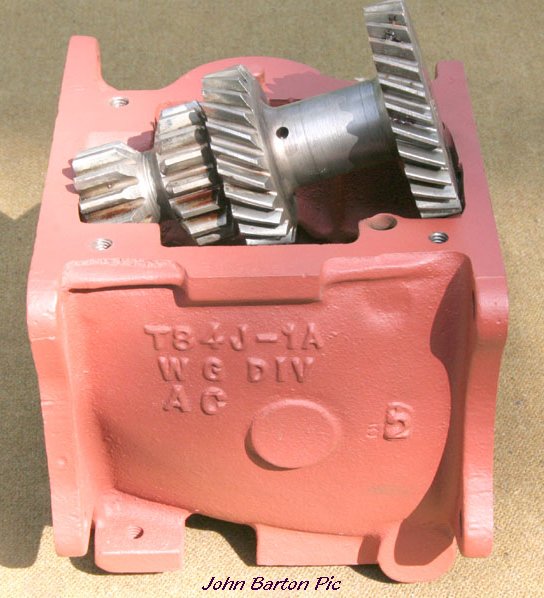
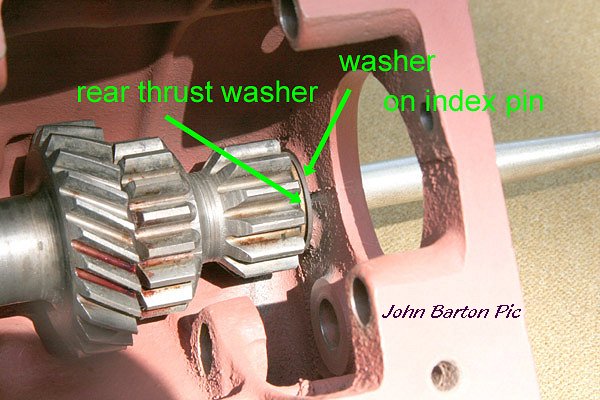
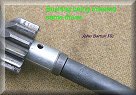
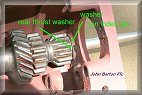
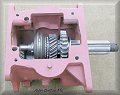
The assembled gear must go in the case..the front thrust washer And the rear thrust washer with spacer must be in place and I have taken the assembled gear to a machine shop for reaming,
The assembled gear must go in the case..the front thrust washer And the rear thrust washer with spacer must be in place
I do just what the 1803B says..put a good coat of grease on them To hold them in place..(no grease for
photo, right side pic)

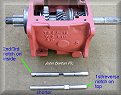
The earlier
section had pics of the index pin and front notches and how to set etc..
tilt the gear so back end goes out rear bearing hole.. ( Above Pics ) Level it off, line it up, and lower…
it will probably take a few times…the fit between washers is slim, I usually knock them off a few times before I get it right.
Let it drop to the bottom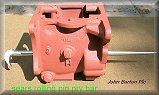
Sometimes the fit is very tight…I have had to play with different combinations
of thrust washers etc..
I did measure the thicknesses once....there were several variations
I have lapped them down.. and cleaned up the case surface if necessary.
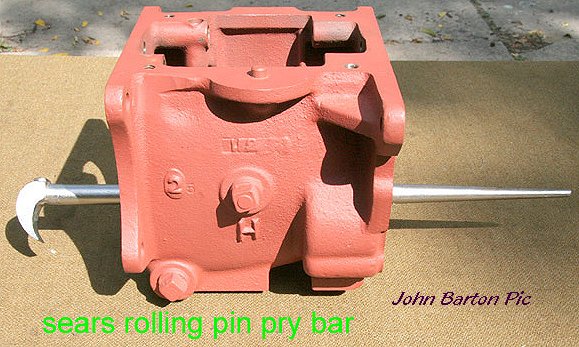
 When I do get it to set right.. I test fit everything by using this Sears rolling pin pry bar as a substitute mainshaft.. hold gear with one hand…raise it slightly and slide bar in..
I roll the gear, get grease spread out to hold washers.. From now on…try not to turn case to much…you want the
Thrust washers to stay in place..
When I do get it to set right.. I test fit everything by using this Sears rolling pin pry bar as a substitute mainshaft.. hold gear with one hand…raise it slightly and slide bar in..
I roll the gear, get grease spread out to hold washers.. From now on…try not to turn case to much…you want the
Thrust washers to stay in place..
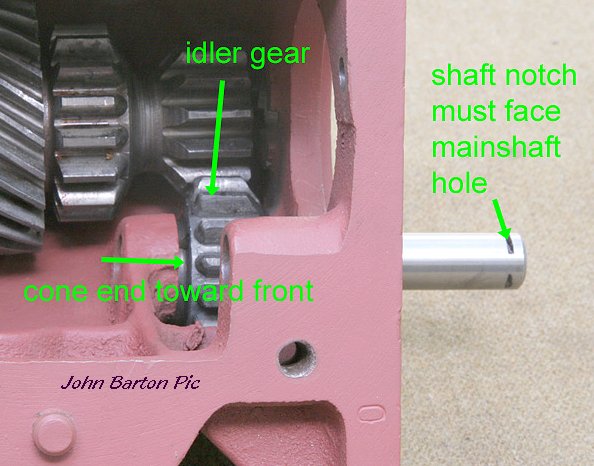
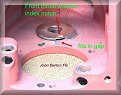
The manual says put the idler in first…I find it easier to put the cluster assemble in first.
Then idler gear…cone end toward front,
Insert shaft from rear…pay attention to notch on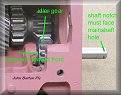
shaft…the notch must line up to accept locking plate..
And this small shaft is harder to turn when all the way in..
The locking plate will do a final line up.. but easier to set it close now.
The next part to go in is output shaft…book says
Insert from rear of case and slide gears on..
It is easier to put gears on and them slide whole assembly in
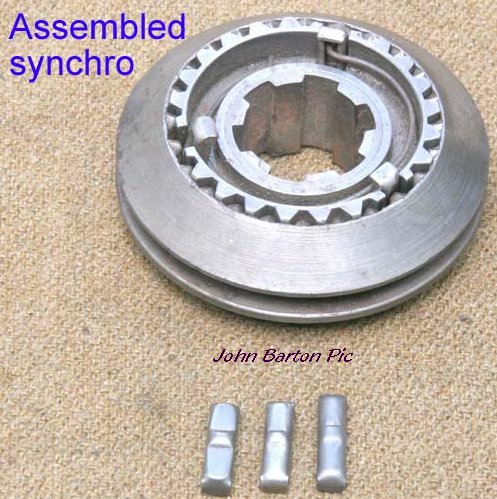
 One of the gears that goes on output shaft is
synchro.. the directions in One of the gears that goes on output shaft is
synchro.. the directions in
different places are not quite clear on how to do this..
You need the springs in.. Locking plates in place, outer hub on.. Some instructions use a clock system, or put in one, turn it over
And do same thing, etc.. The easiest explanation of springs is this picture
above
to the left. Hold the plates with your fingers and slide etc.. The easiest explanation of springs is this picture
above
to the left. Hold the plates with your fingers and slide
outer hub over..a little oil helps. Outer hub should slide back and forth.. you’ll see action of plates and springs,
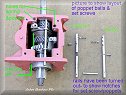
the next picture shows various types of locking plates I’ve seen short, curved, long and flat…I have come across many..
I think i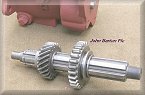 t is just important to have three matching ones.. You should always buy a new synchro and blocking rings.. the first/reverse gear goes on output shaft, fork channel to rear
then second gear. taper toward front.. it only t is just important to have three matching ones.. You should always buy a new synchro and blocking rings.. the first/reverse gear goes on output shaft, fork channel to rear
then second gear. taper toward front.. it only goes on a short distance
. Then blocking ring..the small brass gear.. goes on a short distance
. Then blocking ring..the small brass gear..
Then synchro…. Long end of hub toward front line up notches in blocking ring with plates on synchro..
put snap ring in front of synchro.. slide gears toward front.. tilt and put back end of
 assembly out rear hole in case..
just let it sit there (Left Pic) assembly out rear hole in case..
just let it sit there (Left Pic)
Now assemble
the input shaft bearing with snap ring goes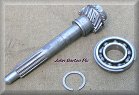 on…shielded side toward
the case, the snap ring holds it on…(Right pic) on…shielded side toward
the case, the snap ring holds it on…(Right pic)
Now is usually when I call my daughter because my fat fingers
 won’t fit in to install roller bearings in back end of input
grease them up.. she doesn’t like the icky grease!!! the last one has to slide in from
top.. sharp needle nose… the snap ring that holds them in doesn’t really touch them..
never taken that snap ring out.. I guess if you buy a new input shaft it will come without
it.. It's a little tricky to install.. won’t fit in to install roller bearings in back end of input
grease them up.. she doesn’t like the icky grease!!! the last one has to slide in from
top.. sharp needle nose… the snap ring that holds them in doesn’t really touch them..
never taken that snap ring out.. I guess if you buy a new input shaft it will come without
it.. It's a little tricky to install..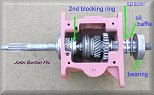 pliers.. screwdrivers, etc..again- you need to be careful now.. if you drop or set
it down too hard.. the bearings will fall out.. now comes another tricky part…
put other blocking ring in place.. use grease to hold in in synchro or put it on back of input shaft and line up notches again..
pliers.. screwdrivers, etc..again- you need to be careful now.. if you drop or set
it down too hard.. the bearings will fall out.. now comes another tricky part…
put other blocking ring in place.. use grease to hold in in synchro or put it on back of input shaft and line up notches again..
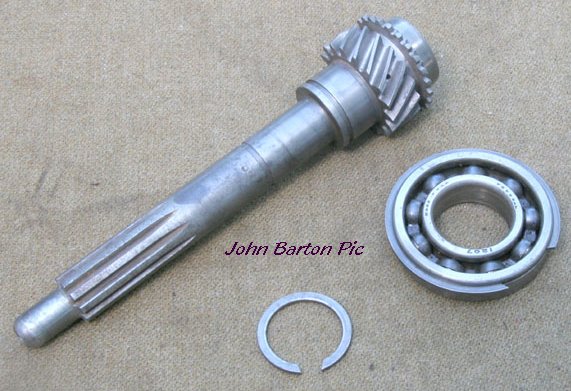
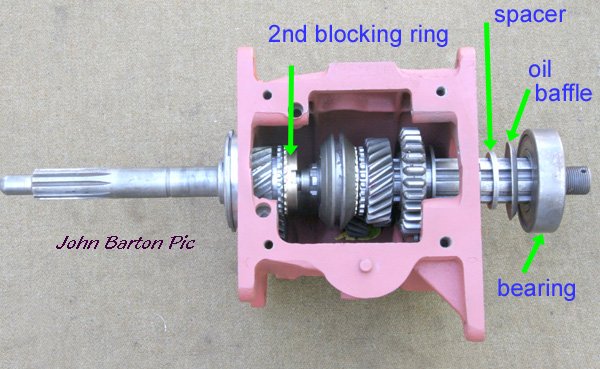
You now need to slide the rear bearing on to line up output shaft.. after
the spacer and oil baffle.. snap ring is already on.. (Right Pic)
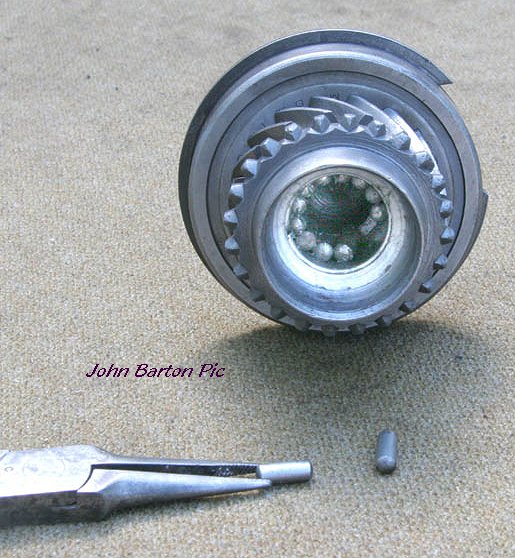
If you get fit correct first
time.. it will look like this, if not…one of the rollers fell out…they
won’t mesh.. you’ll be able to
tell.. because you’ll feel it grinding etc.. gentle tapping on
the 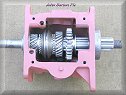 bearing may be necessary to finish..
I try to insert the output shaft tip.. into the roller bearings, and them tap
the front bearing into case...keeps the rollers from falling.. hold on to both shafts from now
on while moving… if either moves out.. the roller bearing or blocking bearing may be necessary to finish..
I try to insert the output shaft tip.. into the roller bearings, and them tap
the front bearing into case...keeps the rollers from falling.. hold on to both shafts from now
on while moving… if either moves out.. the roller bearing or blocking
ring can fall out of place.. with both shafts in place.. some people wire them ..to hold them..
Just be careful.. you’re ready to raise the countershaft gear.. you can’t get
the input shaft in with the countershaft in
place.. so don’t try to do that before now..
Here’s what I do…there are
other methods
 I
turn the case on its side with the idler gear down..it helps locate the
Countershaft gear..I use the rolling head pry bar again..from the front.. I
turn the case on its side with the idler gear down..it helps locate the
Countershaft gear..I use the rolling head pry bar again..from the front..
It is sharply tapered so it can usuall get thru the thrustwashers..which
settled with gear..I slowly and gently try to get it all the way through..
Turn the case completely upside down..
Turn the input shaft…that helps
center and line up the countershaft gear and washers..
Now the trick is to replace the prybar with the mainshaft..
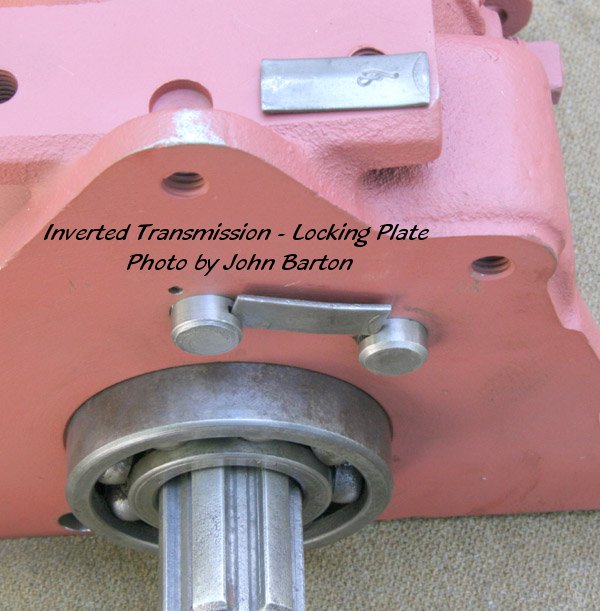
Insert from rear…line up notches for lockplate again..
Some people have a special tool machined..probably easier to insert
mainshaft
As you slide the tool out….either way..? you can do it without any tool…
When case is upside down..if you turn the gears..the countershaft will
center itself..
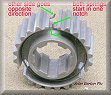
Put lockplate in place..leave mainshaft out just a hair..after front end is
lined up..tap both shafts with hammer. if notches are not lined up
exactly..the lockplate may turn them into position..or you may need to turn
the shafts…look at the neat “F” on extra lockplate..
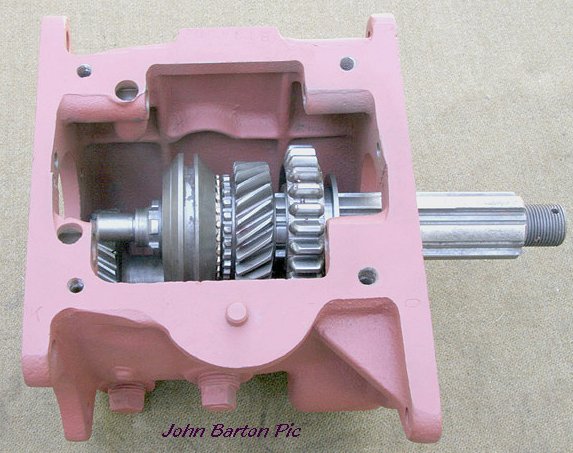
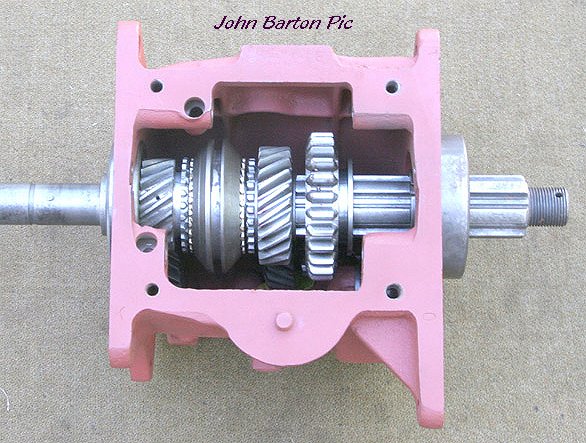
Rotate the gearbox upright, be careful that the gears don't slip out . Now
if you have lined everything up…it should look like this.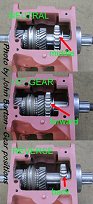
Slide 1st/reverse gear to this
position..neutral..
the input and output shaft should turn independently..squirt a few drops of
oil on synchro’s blocking rings etc.. a new,
dry,transmission does not turn or shift easily..Last pic is that same gear
in three positions
In first-..turn input shaft..output should turn same direction
In reverse-.. the output shaft will turn opposite direction
Thanks, john
Transmission
Assembly Part 2
The final steps with top end actually go pretty easily. The books and manuals
however, don’t have very clear
drawings.. most of them are exploded diagrams- you can’t tell clearly what goes in where..
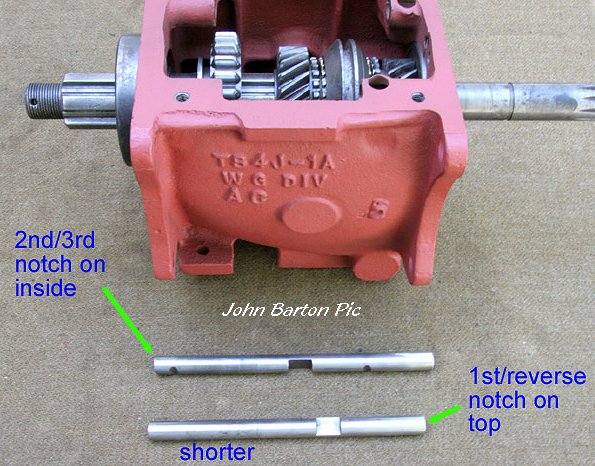
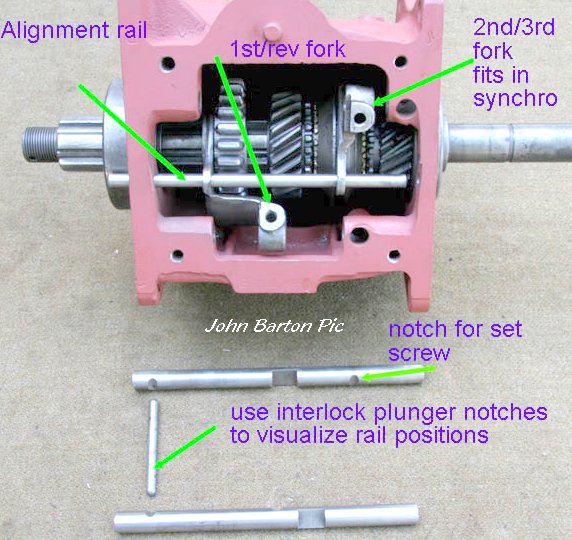
I’m going to try and show the rails, springs, forks, etc…in their relative positions. This picture shows the rails outside..in their relative position.
The 1st/rev is shorter. If you line up the notches for the interlock plunger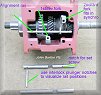 facing each other, and the
cut-outs in rail for shift lever and shift facing each other, and the
cut-outs in rail for shift lever and shift
plate.. 2nd/3rd is on inside..1st/rev is on top…and notches for poppet balls on bottom…it starts to be logical.
 The small rail is to align the forks…the large fork rides in the
channel on the large gear (1st/rev) at back of
the case.. the small fork rides in the synchro groove…slide alignment rail through
the small hole in the case, and respective holes in forks. another picture to show rail arrangement
on the right. The small rail is to align the forks…the large fork rides in the
channel on the large gear (1st/rev) at back of
the case.. the small fork rides in the synchro groove…slide alignment rail through
the small hole in the case, and respective holes in forks. another picture to show rail arrangement
on the right.
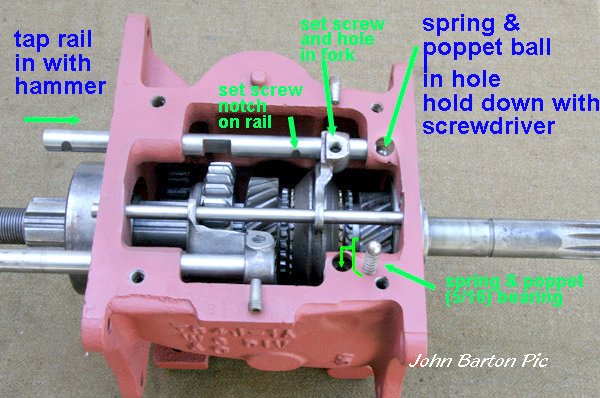
I push the rails in their respective case holes from
the back…through the forks.. up to the holes for the springs and poppet balls…the
spring goes in first on the 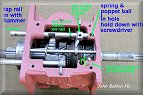 bottom.. then
add the poppet ball.. bottom.. then
add the poppet ball..
The object is to hold the ball down.. while pushing the rail over it..
It can be tricky.. I tried another shift rail.. a drift, etc.. but I wind up just using the flat of a screwdriver.. inserted from the
front.. levering off the top of the hole…and then hitting back end of rail with hammer..
the first few times.. it will pop out.. fly all over the room.. a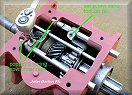 third hand covering the hole.. or handling the hammer is better..
and.. now that the spring and ball are clean.. it can fly out pretty fast. A
brass drift, with a flat surface, the same size as the hole can be used.
However, I do recommend that you Use and Wear Safety glasses… or keep it covered! now you wiggle
the rail to line up with the notch on the rail.. with a set screw hole on
the fork ..the set screw goes in pretty easily now.. Compared to getting them out…
but you do need to line up the fork and the notch for it to go all the way in third hand covering the hole.. or handling the hammer is better..
and.. now that the spring and ball are clean.. it can fly out pretty fast. A
brass drift, with a flat surface, the same size as the hole can be used.
However, I do recommend that you Use and Wear Safety glasses… or keep it covered! now you wiggle
the rail to line up with the notch on the rail.. with a set screw hole on
the fork ..the set screw goes in pretty easily now.. Compared to getting them out…
but you do need to line up the fork and the notch for it to go all the way in
Next. Finish tapping the alignment rail and the shift rails in.
Now it’s ready for front gasket. NOS one are always shrunken up.. you can put in the microwave, or in a pan of boiling water to loosen it up. It is easy to make
them.. use the front of case as template.. the gasket can be inverted.. it should be
obvious…but if you make or buy one…make sure the hole for the oil passage is
you can put in the microwave, or in a pan of boiling water to loosen it up. It is easy to make
them.. use the front of case as template.. the gasket can be inverted.. it should be
obvious…but if you make or buy one…make sure the hole for the oil passage is
there, and in correct place..
I also put some sealant on the front end of the mainshaft.. under the gasket. it doesn't turn..
with gasket and sealant, and being pressed against bell housing it shouldn't
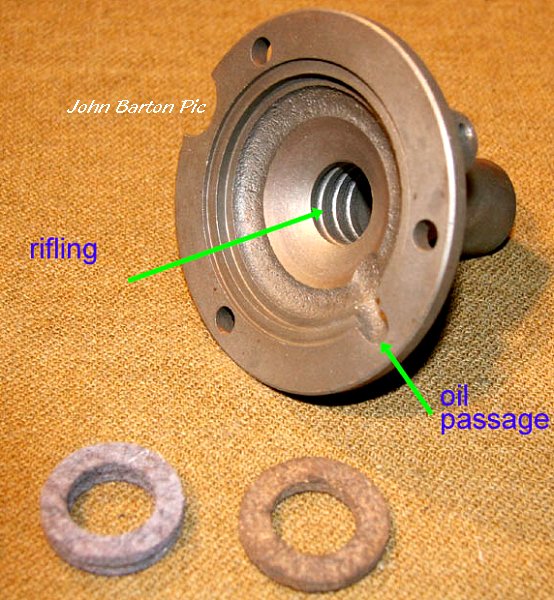
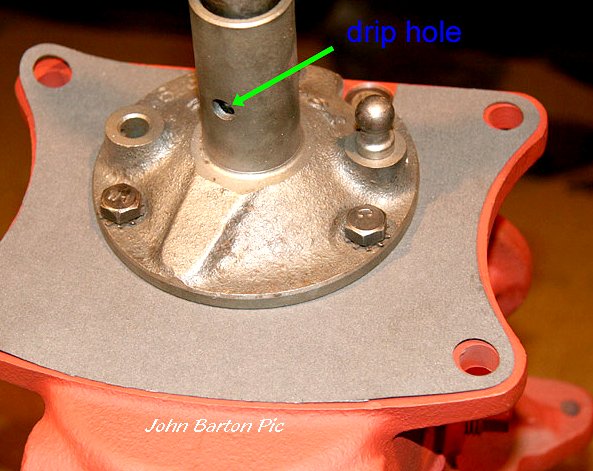
leak.. more peace of mind..! Oil from inside the case is used through this hole
to lube the front bearing.. it is  opened to the front-inside the retainer.
And the retainer uses a little splash lube to travel out the
rifling inside the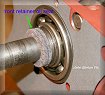 bearing carrier..
the input shaft is turning in there to propel oil.. to drip out the hole on bottom to grease bearing carrier..
Not too much
oil.. because there is a seal. bearing carrier..
the input shaft is turning in there to propel oil.. to drip out the hole on bottom to grease bearing carrier..
Not too much
oil.. because there is a seal.
 I have used the old cork seals..or the new fabric
ones.. I have also made them from
carpet liner..they keep oil from running out… but have to let a little bit wick out I have used the old cork seals..or the new fabric
ones.. I have also made them from
carpet liner..they keep oil from running out… but have to let a little bit wick out
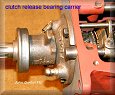
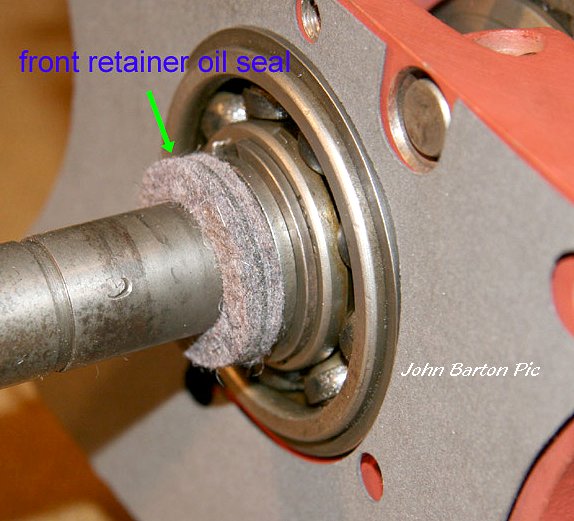
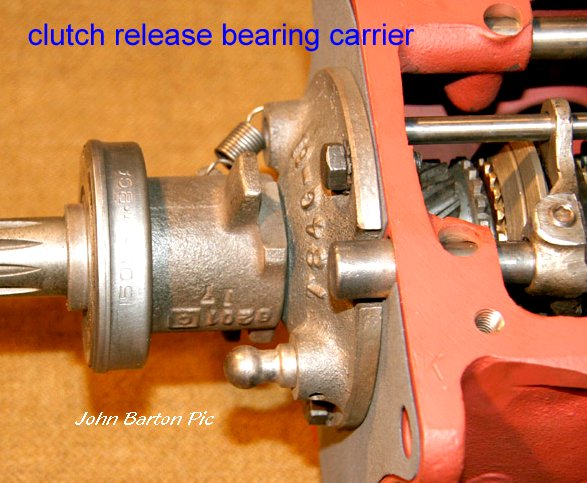
This picture shows release bearing on carrier, it slips on the
retainer.. I put just a little grease on it. The spring pulls the carrier back toward
the case..
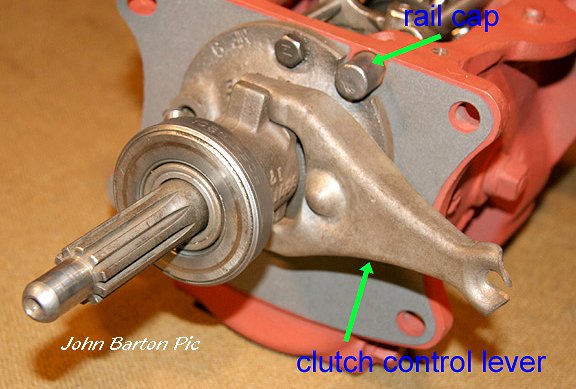
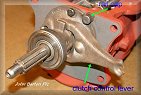
The ball is the pivot for the clutch control fork.
 We
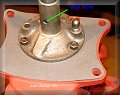
almost have a transmission..! NOTE:-The Rail Cap on front of the case, this is usually missing,
supposed to keep oil from coming out. Put a little sealant on outside edge before you smack it in place
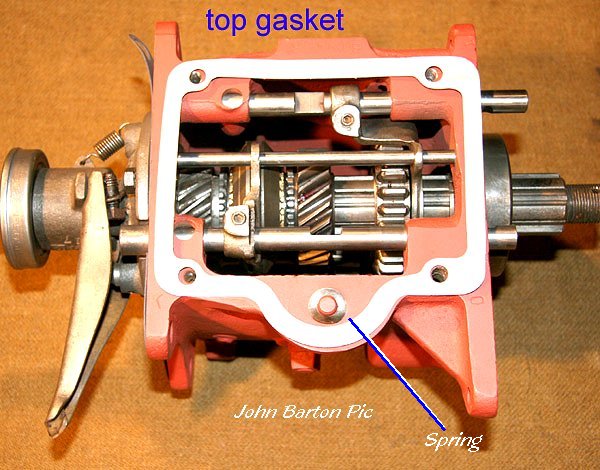
(Left pic) The Top Gasket…and shift plate spring…under the shifter plate..!
yes.. "The Spring!"...I have seen the all the discussions.. the math “proves” We
almost have a transmission..! NOTE:-The Rail Cap on front of the case, this is usually missing,
supposed to keep oil from coming out. Put a little sealant on outside edge before you smack it in place
(Left pic) The Top Gasket…and shift plate spring…under the shifter plate..!
yes.. "The Spring!"...I have seen the all the discussions.. the math “proves” it doesn’t do
anything on top…but if it is under.. it holds shifter plate up against machined surface on inside of top
housing.. which acts as a fulcrum and levers far end of shift plate down into notch on rail…
(right pic) assemble it without the spring…reach down thru top housing with
wire.. you can rattle shifter plate.. assemble it with spring on top of shifter
plate.. again reach down with wire.. the shifter plate rattles.. Assemble it with
the spring under the shifter plate.. no rattle..
it doesn’t do
anything on top…but if it is under.. it holds shifter plate up against machined surface on inside of top
housing.. which acts as a fulcrum and levers far end of shift plate down into notch on rail…
(right pic) assemble it without the spring…reach down thru top housing with
wire.. you can rattle shifter plate.. assemble it with spring on top of shifter
plate.. again reach down with wire.. the shifter plate rattles.. Assemble it with
the spring under the shifter plate.. no rattle..
I believe it goes under plate…but then, I didn’t "write the book on transmissions"
All it needs now is to
put the shifter plate on..
If I’m not using it in a vehicle right away.. I will wire back bearing in place,
just wrap wire around on of the top housing bolts.. put a little oil in..
play with rails.. moving them.. try turning input and watch output..
A new and dry transmission does not shift or turn easily.. you will think it is not right..
when you fill it with oil.. and have it turning with a motor.. it will shift..!
Synchros actually require a layer of oil on the blocking rings to function..
Mercedes books have a really good section on the dynamics of manual transmissions…
hope this helped a few people.. The transmission is not beyond anyone who can work on this
jeep.. it is pretty straight forward..
Comments and tips appreciated... this is just my way of doing transmissions..
I'm sure there are others..
Thanks...John
FITS
& TOLERANCES

Home
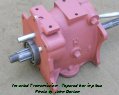
John Barton's T84 G/Box 1
2
g503.com |