|
- John Barton's -
G503 T 84 GEARBOX REPAIR
MANUAL
-DISASSEMBLY, REPAIRING,
AND RE-ASSEMBLY OF THE T 84 -
- PART 2 Inspection -
Again, most of this is for those who have not been inside the T84.
I have been cleaning and inspecting the greasy transmission from the earlier post.
It appears to be in good shape but I did not drive it, so really, no sure way to
tell for sure.
I’m going to replace a few parts but all the main pieces were very good.
Most of the shifting problems that I’ve seen in T84’s were caused by wear and slop in the
shift plate, shift lever, or top housing- often just switching out one or more, to make a different combination would fix or make
it better.
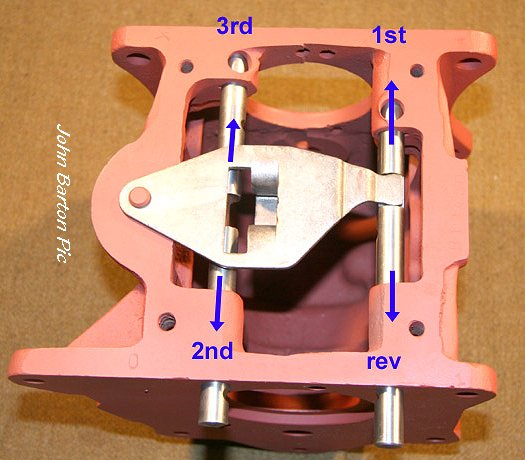
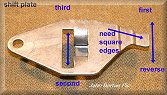 The
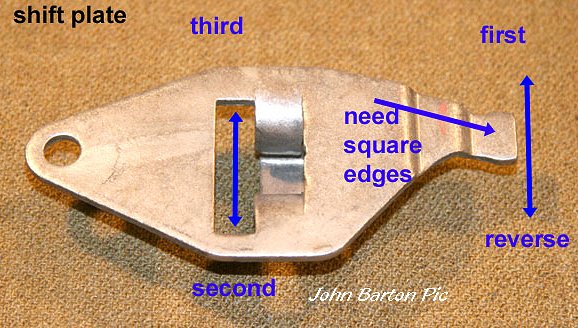
Shift Plate - The pivot hole needs to fit tightly on case. . the other end that rides in
the notch on
reverse/1st rail needs to be sharp edged. (Right Pic) The
Shift Plate - The pivot hole needs to fit tightly on case. . the other end that rides in
the notch on
reverse/1st rail needs to be sharp edged. (Right Pic)
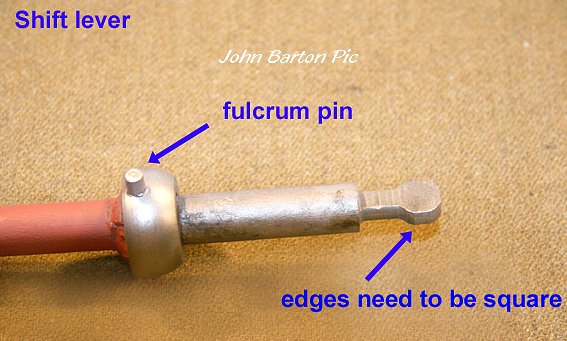
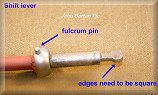 These fulcrum pins are
good…I have seen them worn to a V, or down to nubs.
This pin can be driven out and replaced. One of the ORD’s gives the dimensions.
The bottom ball that moves the These fulcrum pins are
good…I have seen them worn to a V, or down to nubs.
This pin can be driven out and replaced. One of the ORD’s gives the dimensions.
The bottom ball that moves the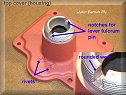 shift plate and 2nd/3rd rail needs to be complete and sharp also.. this one looks good.
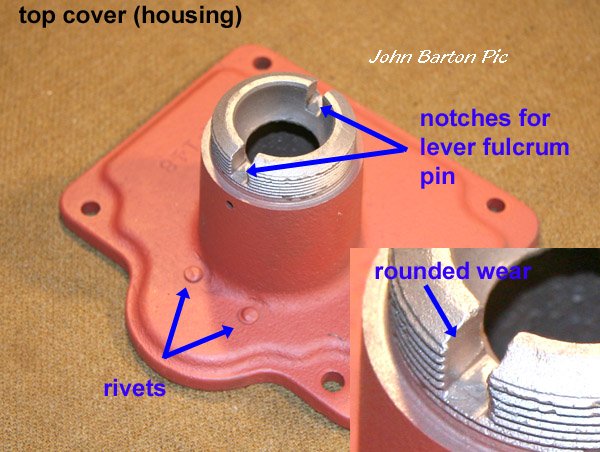
The notches on the top housing for the fulcrum pins need to be straight…this will work, but you can see the rounded surfaces.
shift plate and 2nd/3rd rail needs to be complete and sharp also.. this one looks good.
The notches on the top housing for the fulcrum pins need to be straight…this will work, but you can see the rounded surfaces.
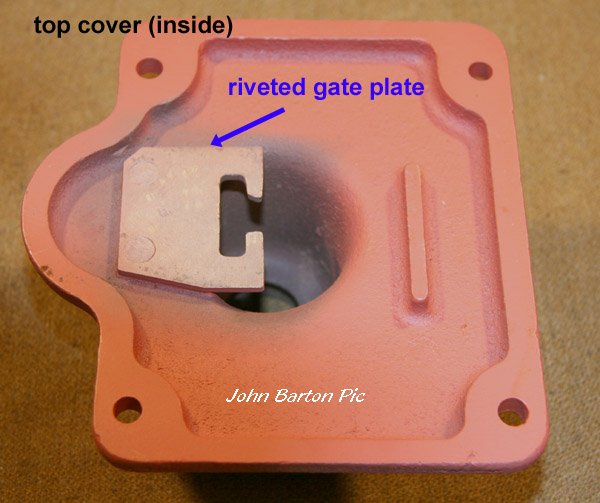
 On bottom of
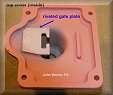
the housing.. the plate with gates needs to be riveted firmly and the gates not worn.. On bottom of
the housing.. the plate with gates needs to be riveted firmly and the gates not worn..
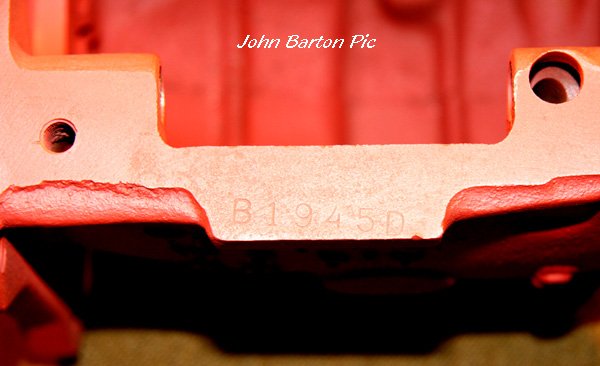
This one was a replacement- riveted..(pounded) in.. You can see “F”..
rest of the top is Willys.
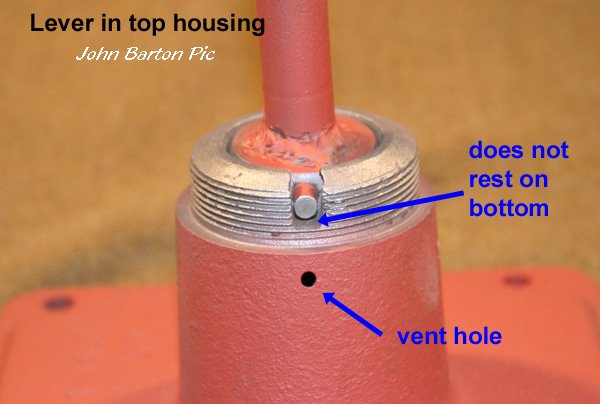
The fulcrum pin does not ride in bottom of notch in good housing…ball supports lever..
I haven’t found a worn out ball.. but this one looks like it was repaired…welded on rod..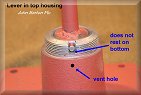
I can’t always find or afford new top parts.. so I try that swapping first
The good thing is you can do that with transmission still in jeep..! But if transmission was really no good.. it was usually the transmission
case.. which led to or resulted in other bad things.. Poor lube is probably biggest killer.
 I think this transmission is pretty sturdy, and I have taken apart several that
worked fine…even though looking at the gears, you would think it was trash.
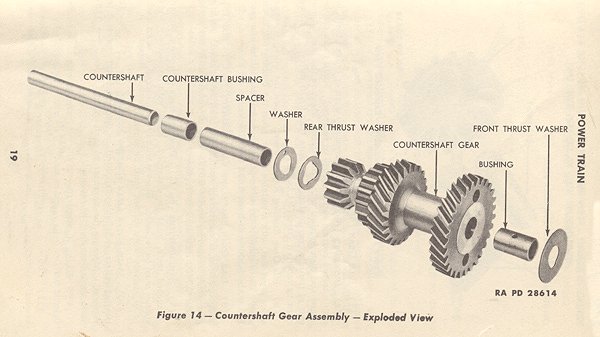
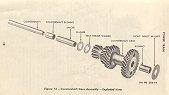
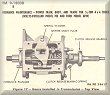
For sake of uniformity with part names.. here’s one page from 1803B- I think this transmission is pretty sturdy, and I have taken apart several that
worked fine…even though looking at the gears, you would think it was trash.
For sake of uniformity with part names.. here’s one page from 1803B-
I’ll try to use correct
names.. instead of cluster gear and bearing shaft, etc.
Worn parts may be noisy and grind a little.. but learning to shift a certain way
(doubleclutch) can overcome this..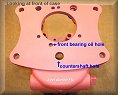
But, getting back to the case..
Both front and back holes that hold the countershaft have to be good. The holes for the front input bearing have to be good.
I have not come across a rear bearing hole that was boogered.. the bearing is mostly supported by
the transfer case.
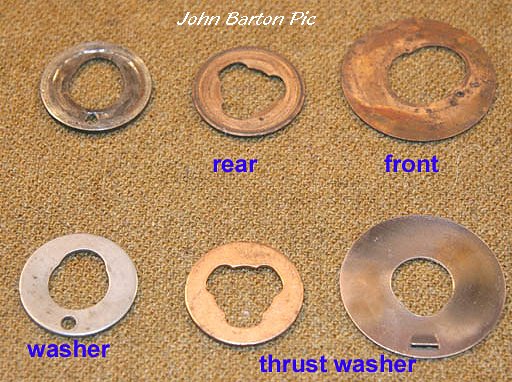
Then, the surfaces inside the case that ride against countershaft gear thrust washers and washers have to be good…
 If not, they tear up thrust washers etc. Again I have seen these pretty bad but have been able to salvage
the case sometimes.
Note small index pin.(Left pic) .it fits in the rear countershaft washer. Not important from this
side.. but I’ll picture later what needs to be done.
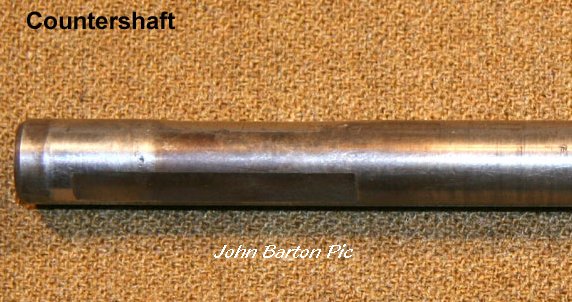
I don’t know the technical description.. but the countershaft fit through the case,
In these holes- has to be a tight slide If not, they tear up thrust washers etc. Again I have seen these pretty bad but have been able to salvage
the case sometimes.
Note small index pin.(Left pic) .it fits in the rear countershaft washer. Not important from this
side.. but I’ll picture later what needs to be done.
I don’t know the technical description.. but the countershaft fit through the case,
In these holes- has to be a tight slide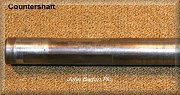 fit. You should barely be able to push in or out by
hand.. if the countershaft slides with no effort holes are too worn. Don’t have a picture of really worn oblong holes..
but you will know- from the countershaft loose fit and pushed up metal on edges of holes.
That I’m sure, lets the countershaft wobble.. it winds up like this..
(Right pic) fit. You should barely be able to push in or out by
hand.. if the countershaft slides with no effort holes are too worn. Don’t have a picture of really worn oblong holes..
but you will know- from the countershaft loose fit and pushed up metal on edges of holes.
That I’m sure, lets the countershaft wobble.. it winds up like this..
(Right pic)
This is not the one from my rebuild- it was very good but when you see one with grooves
like these, (not the flat machined area-that for lube) dip on top edge! and discolored from heat, the bushings inside
the countershaft gear are probably worn also.
In my experience- worn gears do not seem to cause as much trouble as a countershaft gear that hops around.
The transmissions that I found to be undriveable always had a screwed up countershaft..?
When I show the assemble pictures, I’ll show bushings and spacers in countershaft and
gear.
When countershaft, bushings, etc.
go.. the thrust washers wind up like this- worn into oblong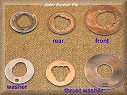 holes like the case holes.
Then the transmission has- serious problems!.. holes like the case holes.
Then the transmission has- serious problems!..
and no changing of top parts will fix it. I have seen cases with the countershaft holes drilled out and a bushing inserted.
Don’t have a pic…I was told once that this was and Israeli mod.. I don’t know.?
I presume these work.. so a boogered case can be repaired.
 Without tech drawings I don’t know how to find center
for boring out an oversize wobbly hole.. I’m sure a good machinist could figure it out.
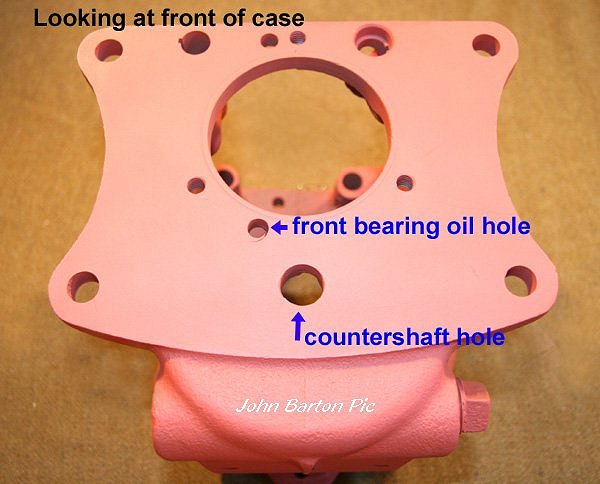
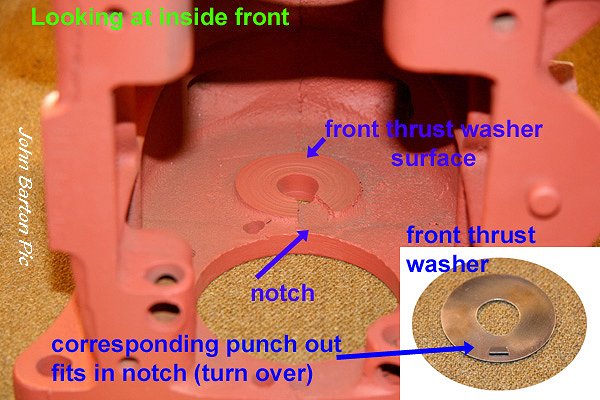
This is a pic of the front inside case where front thrust washer rides. Without tech drawings I don’t know how to find center
for boring out an oversize wobbly hole.. I’m sure a good machinist could figure it out.
This is a pic of the front inside case where front thrust washer rides.
A good case has flat surfaces there, not grooved. Note angle notch.. the front thrust washer has a corresponding
punch out that has to fit.
When you assemble. It keeps the thrust washer from spinning. I’ll picture that again later.
It also lets lube flow down I presume..
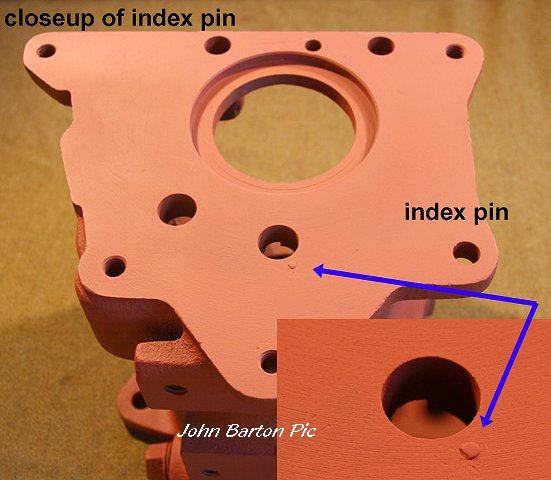
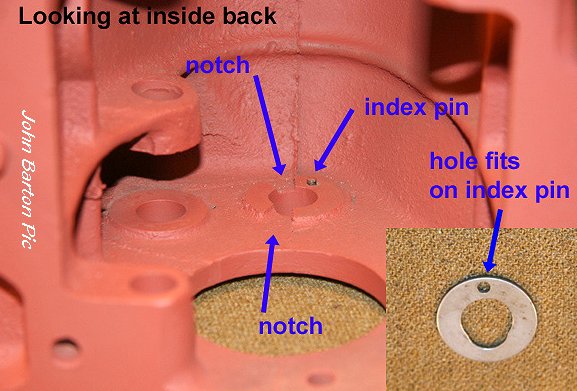
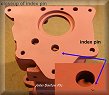
Here is pic of inside rear of case around countershaft hole.. (Right pic)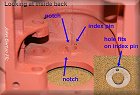
The index pin has to protrude into
the case.. just enough to fit in the
washer hole and prevent it from turning. In this pic I have pushed it too far so you can see it.
It is often worn down.. and you can’t see or feel it.. you punch it in from back with small drift..
It only has to protrude less than thickness of washer. If it sticks out more..
First, you won’t get the countershaft gear in.. and second it will tear up rear thrust washer.
This rear surface is in good shape.. I have seen them grooved also..
Note on this late (H) case there are two notches.. I think they are for lubrication as rear washer has no corresponding tab..
early cases don’t have these notches or only have one.
If either of the thrust washer surfaces are grooved.. I take an angle grinder..
with light grit pad and clean up surface…not to get it machined smooth.. just
clean.. I haven’t disassembled one that I have done… so I guess it works??
To prep the case.. I wash well/flush with solvent etc to get all oil and particles out..
I glassbead and clean with air.. wash.. spray etc again to clean.. I put in
the drain and fill plugs…with sealant, tape off front and rear
holes- then fill with inch or so of red primer.. slosh it all over turn it upside down…spray rest of
it.. let it dry for few days.. I do not know if the inside was originally painted. I read once that
the cast is
porous.. and that engine crankcases, etc. were painted in old engines- I don’t see how it can hurt..?
 I then take bore brushes on a drill to all holes, poppet ball holes, and run taps thru all threaded holes.
If you don’t clean all the holes.. you’ll have a hard time with rails, countershaft, fork alignment rail, idler shaft,
etc.. bearings won’t fit in etc.. I then take bore brushes on a drill to all holes, poppet ball holes, and run taps thru all threaded holes.
If you don’t clean all the holes.. you’ll have a hard time with rails, countershaft, fork alignment rail, idler shaft,
etc.. bearings won’t fit in etc..
I spray a little WD40 on to keep it til I get ready..
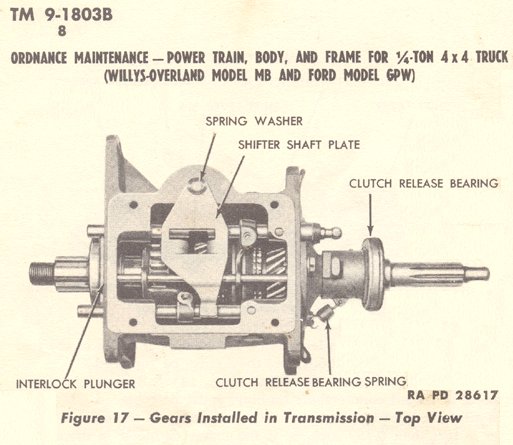
Here is another pic from 1803B..shows the transmission from the top. 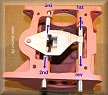
With this and the next picture I want to show how
the shift lever moves rails,
When you figure out how it shifts.. you can see how the synchro moves, works,
etc. After you play with it.. it all seems logical and you can probably figure out
which part is causing a problem. Now that I have case cleaned.. it was in good shape.. I’m going to start
the rebuild..
Now that I have case cleaned.. it was in good shape.. I’m going to start
the rebuild..
Like I said earlier.. the 1803B is pretty good.. it is what I started with…
I learned a lot from other collectors.. join a local chapter.. have someone give a demo…get a lot of feedback and different
ideas.. and tips.. Assembly date.. have seen other places or not at all? I’m taking pictures of assembly
now.. few days I hope..
I hope some others will add ideas or suggestions.
Thanks, John
Home
T84 1
3
4 g503.com |