|
- John Barton's -
G503 T 84 GEARBOX
REPAIR MANUAL
-DISASSEMBLY, REPAIRING,
AND RE-ASSEMBLY OF THE T 84 -
- PART 1
Disassembly -
Click here to
 Download the Transmission Repair
Section from TM 10-1513 (3.8MB)
Download the Transmission Repair
Section from TM 10-1513 (3.8MB)
8:58 PM 8/29/2005
This is probably more for people who have never worked on a T 84 transmission.
This transmission is actually pretty simple, and I would encourage you to try it..
The best book is the TM9-1803B I don't know if it is reproduced separately...but it is in the 3-in-1 book, and available on
CD's etc.. that manual has everything you need.. but hopefully I'll help with a few things.
I'll show some tricks.. but please send me any corrections or things that you've found..
I don't do everything in same order as 1803B but if you do a few transmissions, you can see how to
knock it down quickly
I will post a lot of pictures... not sure how the g503 will handle it, but I'll
try
That is the one thing missing in most manuals.. good pics. Mine aren't great, but
I'll show more than the manual so it will take more than one page...I have a few transmissions...so the
pics will use clean and dirty parts.. but in the last posts where I show
assembly.. it should all be clean. . .
Like I said.. it's pretty simple take out a couple of set screws, punch out
some rails, three bolts, a shaft lock, and a snap ring.. and the T84 will almost fall apart..
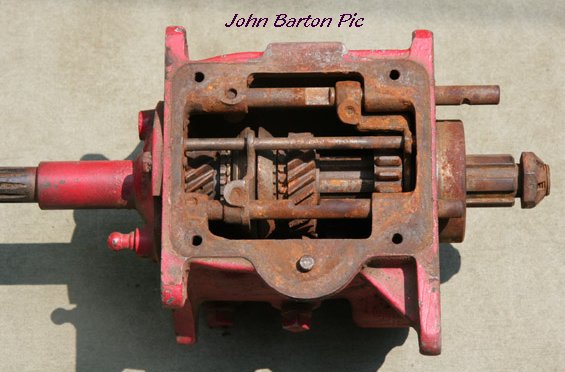
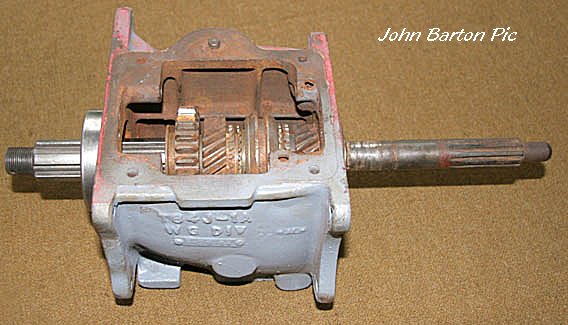
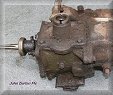
but first.. depending on how you get a jeep this is what most transmissions look like.
This one was sitting in a open jeep for years..
rusty.. but look at the actual gears.. not bad!
 Or
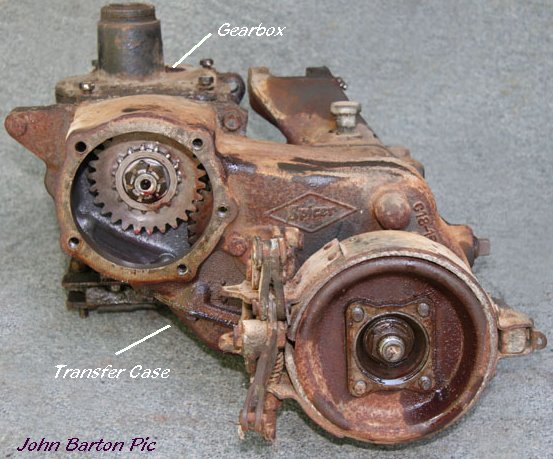
it looks like this.. covered in 40 years of grease, when I strip a jeep...the body comes off first,
so I wind up with transmission/transfer together, drain them, take the top off
the transmission, and back off
the transfer case. I used to flush them.. but a lot of small parts may be there
and I want to see how much metal is in bottom before you can work on transmission, you have to separate them
there are two transfer case types.. naturally...early and late. pics for those who haven't seen difference. Or
it looks like this.. covered in 40 years of grease, when I strip a jeep...the body comes off first,
so I wind up with transmission/transfer together, drain them, take the top off
the transmission, and back off
the transfer case. I used to flush them.. but a lot of small parts may be there
and I want to see how much metal is in bottom before you can work on transmission, you have to separate them
there are two transfer case types.. naturally...early and late. pics for those who haven't seen difference.
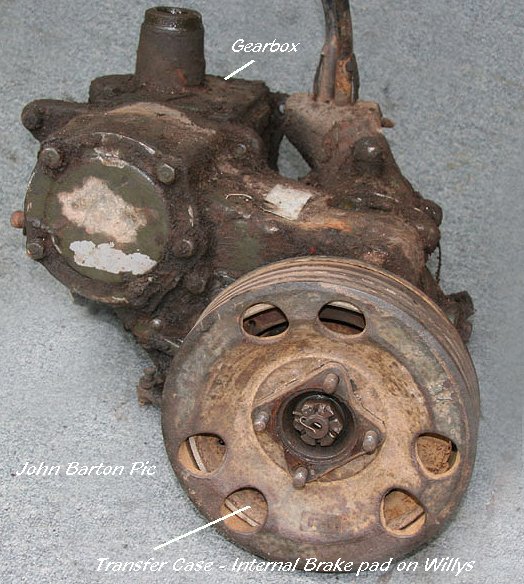
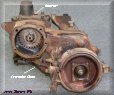 The early one had a external contracting brake The early one had a external contracting brake
the lining is on the outside band.. contracts onto the drum
 The late one had a linings,
shoes similar to
wheel brakes that expanded out into larger drum someone else will have to post changeover dates.. The late one had a linings,
shoes similar to
wheel brakes that expanded out into larger drum someone else will have to post changeover dates..
I believe Ford used the same early one throughout production,
but it is not unusual to find late style on GPW's.. from refits or rebuilds..
Willys used both.. The hand brake cable termination- where it connects
the lever, was
different I will post a photo of each type later.
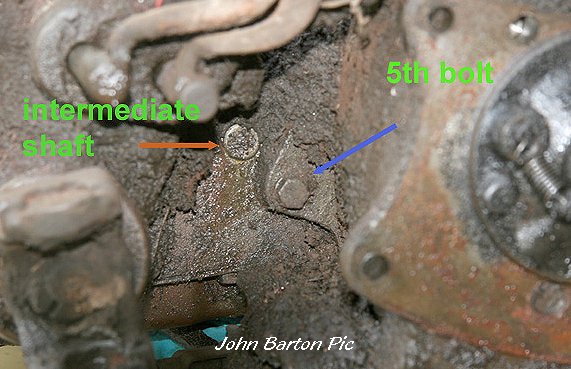
Five bolts hold the transfer case to the transmission.
Four of these are pretty obvious and go from back thru the transfer case into the transmission...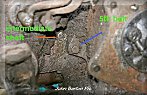
The fifth one is opposite and not always visible.
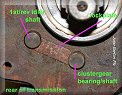
Pic on the right shows it going from opposite direction note intermediate
shaft.. all MB's & GPW's had this 3/4 inch shaft.. post war, and civilian cases had..1 inch,
and later 1 1/4 inch shaft.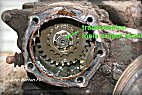
That is one way to tell if you have an original transfer case.
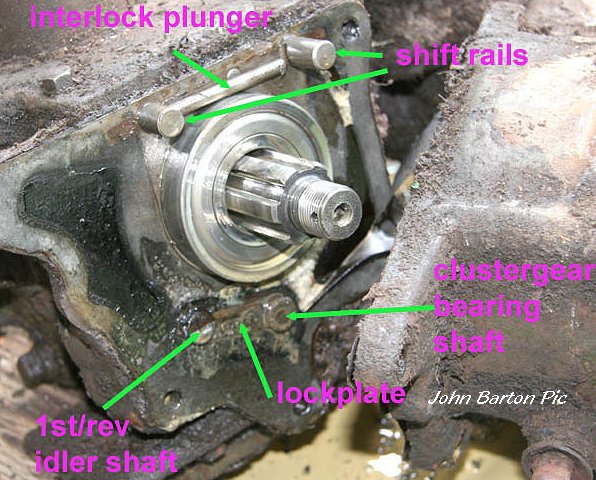
After the bolts are out... and you remove the cotter pin and nut, washer, and
gear.. sometimes the cases will just fall apart.. note the interlock
plunger.. it gets discussed often on g503 as missing etc..?
I have never found a jeep without it? wouldn't know how to tell...most often..
You may need to smack the end of the transmission
output shaft.. you'll need a drift or piece of wood 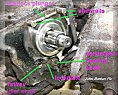 through the large hole on back of
the transfer case. Usually the rear bearing will stay stuck in the transfer case ..or the output shaft will move back with
the transfer case and you will hear little parts falling around inside
the transmission... through the large hole on back of
the transfer case. Usually the rear bearing will stay stuck in the transfer case ..or the output shaft will move back with
the transfer case and you will hear little parts falling around inside
the transmission...
I will mention that a few times.. rarely does everything stay together so that all the little
parts wind up where they belong...don't worry about it..
If it all comes apart easily, the little parts may stay put until you get there.
but..... usually they fall about, and they all are coming out eventually anyway,
you need to do all this work on a bench with carpet.. pretty soon small pieces are going to be flying out..!
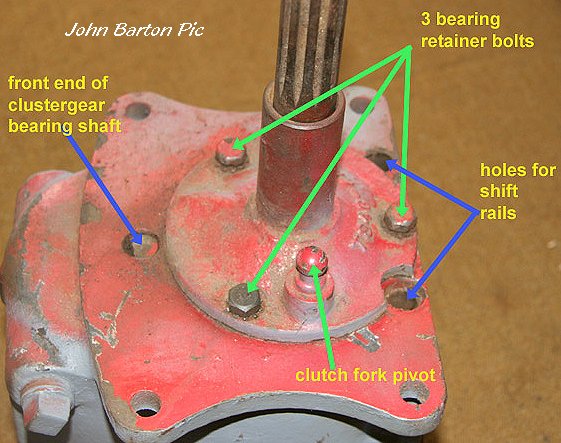
Pic of top of transmission .. 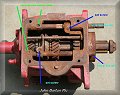
Labelled a few parts on the
pic on the right .. note set screws that hold forks on shift rails...in a old goobered
transmission... they are the hardest part to get out in a oiled or working
transmission.. they usually come out easy, you'll need the correct tool- the
Bristol wrench....!! (Available through Ron Fitzpatrick) I have seen the set screws stripped,
welded, hammered...
someone didn't have the correct tool..!
I have the Bristol wrench but use it for display.. first.. if you have an old one like this..
spray it with liquid wrench over a few days...to get the set screws out.. I use a t27 torx socket..
clean out the recessed heads with a pick tool and air.. I have ground the t27..to put just a little point on it
it reaches down further and helps with next step I put it in set screw (with an extension)
and smack it pretty hard with hammer.. that and liquid wrench usually works to free them.
I believe the manual says take off the front bearing retainer etc...first
I do the set screws first... parts don't jump around so much when everything is still together
with the set screws out...Rails can be driven out with a skinny drift, the 1803B shows using a screwdriver in
the rail notches to drive them out.
I believe a lot of shifting problems stem from slop where the shift plate (not in any pics yet) rides in these notches..
 I
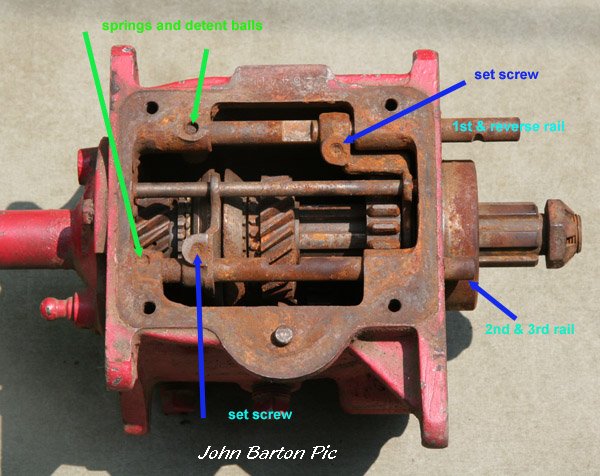
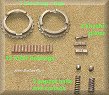
use the drift so I can catch the poppet balls. Now is when you need a little care,
under the rails in the two front holes (labelled above) are the springs I
use the drift so I can catch the poppet balls. Now is when you need a little care,
under the rails in the two front holes (labelled above) are the springs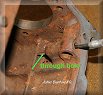 and poppet
balls.. they can be free and will fly out..
or get stuck in crud and not budge.. and poppet
balls.. they can be free and will fly out..
or get stuck in crud and not budge..
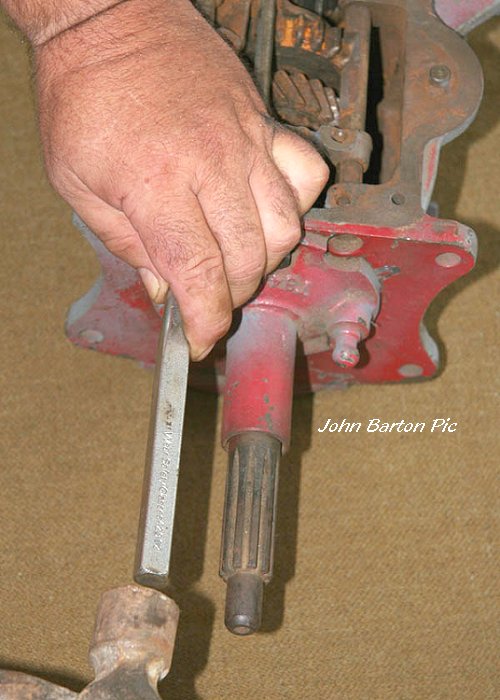
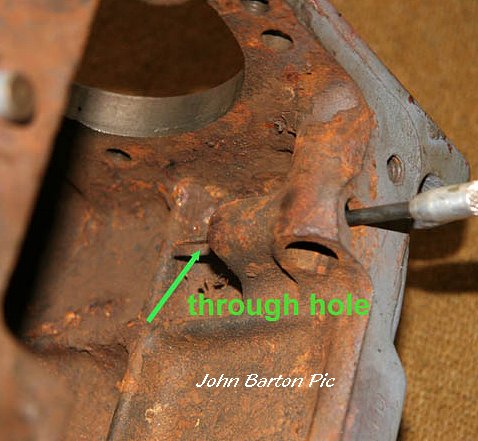
I hold my hand over the hole to catch them. (Left Pic) and to keep from getting popped into
an eye, hold the drift with the same hand.. and hammer them out.. when the poppet ball and spring won't
come out.. don't worry ... as you can see in this picture on the right of an empty
case.. the hole is thru drilled... you can use a piece of bent coat hanger to push up
the ball and spring from the bottom.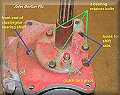
 The front bearing retainer comes off
easily.. three bolts. the third 1/4 inch rail aligns the forks.. push out with
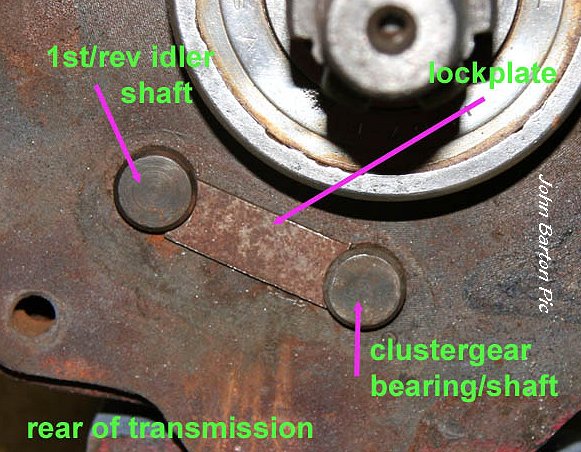
a drift also.. top stuff is all free and out now, use a drift to take off
the lockplate between two shafts on the rear.
(Left Pic) Use a drift to drive out the bearing...it's the long shaft that clustergear rides
on.. either way but from front... driving out the back is better so the notch
for the The front bearing retainer comes off
easily.. three bolts. the third 1/4 inch rail aligns the forks.. push out with
a drift also.. top stuff is all free and out now, use a drift to take off
the lockplate between two shafts on the rear.
(Left Pic) Use a drift to drive out the bearing...it's the long shaft that clustergear rides
on.. either way but from front... driving out the back is better so the notch
for the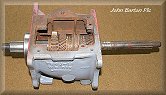 lockplate won't catch. The clustergear will fall down into the bottom of
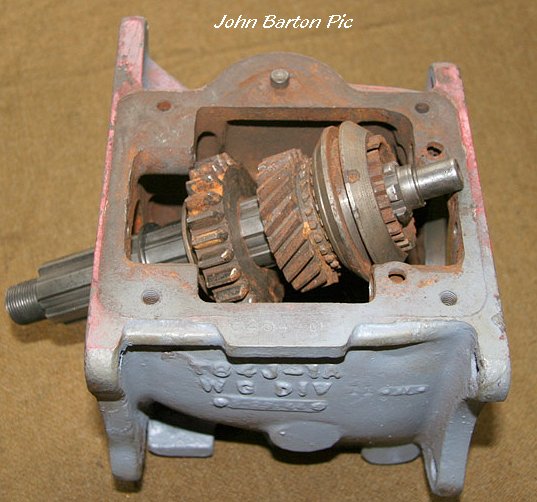
the case. The front input shaft may now fall out or be stuck where the bearing sits in
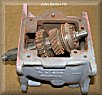
the case.. Pic of all top stuff and front retainer removed
lockplate won't catch. The clustergear will fall down into the bottom of
the case. The front input shaft may now fall out or be stuck where the bearing sits in
the case.. Pic of all top stuff and front retainer removed
As I said by now.. usually one or both shafts has come loose and small parts are free.
Wiggle the front input shaft.. light taps with a mallet is OK.. don't hit from
the inside.. the shield is not strong enough..
 It wont come out
until the clustergear is dropped.. but now it should be free. Now if you wiggle
the gears on the main output shaft you can get it out of the case.. easier
this way to get the snap ring off.. It wont come out
until the clustergear is dropped.. but now it should be free. Now if you wiggle
the gears on the main output shaft you can get it out of the case.. easier
this way to get the snap ring off..
Again- while you're doing all this...the synchro blocking gears, and roller bearings will be flopping around..
just make sure they don't roll away.. the roller bearings will be in the case..
and some will still be stuck inside the input shaft.. take the whole main shaft out the top with gears still on it.
Sometimes the gears don't slide well...even on a good transmission.. line it up in original
position, use a drift from the front end ..1st/rev gear will hit the back of
the case.. this will get gears sliding.. and out.. or not..!

The 1803B shows using a screwdriver to
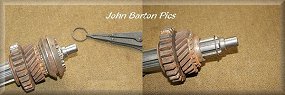
pry this snap ring off.. easier this way, with it out!...and using snap ring pliers.
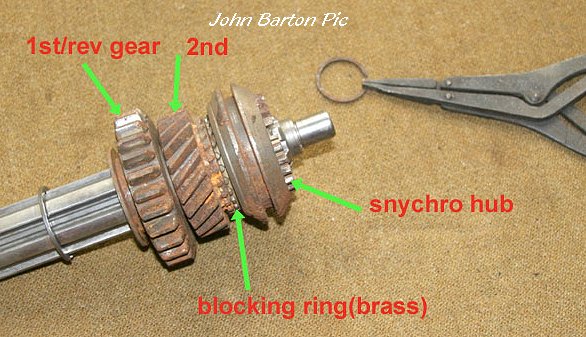
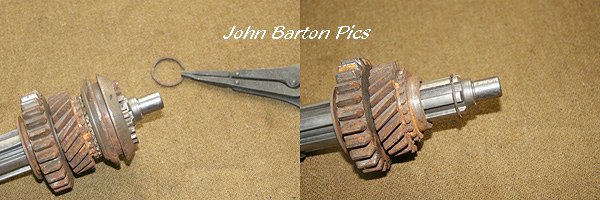
I have this pic of the mainshaft with the synchro on.. and then with it off and snap ring back on to show
the position.. it's hard to pry with screwdriver. 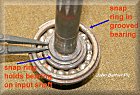
If
you can't get it out of the case.. the snap ring in front of synchro hub needs to come off..
I have snap ring pliers with compound handles.. and little dimples for snap
rings.. works fine.. Then you'll still need to smack it out back so the gears come off..
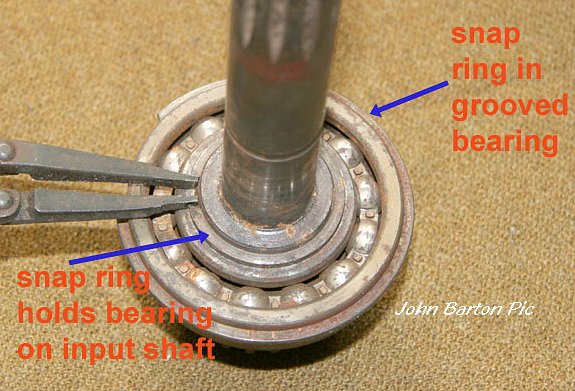
 The
snap ring that holds bearing on the input shaft is the same type. But if the
bearing is OK.. and the input shaft is OK.. leave it! The
snap ring that holds bearing on the input shaft is the same type. But if the
bearing is OK.. and the input shaft is OK.. leave it!
Push the small idler gear shaft out back, and take out idler now...on a piece of
carpet.. gently turn whole case over, poppet balls,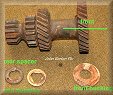 synchro gears, roller bearings, cluster gear, bushings,
etc will come out.. the springs that hold snychro plates usually stay in place.
it's pretty much apart now.. synchro gears, roller bearings, cluster gear, bushings,
etc will come out.. the springs that hold snychro plates usually stay in place.
it's pretty much apart now..
Here are parts that come out with clustergear. and case is empty there is a internal snap ring that holds
the roller bearings inside the 3rd gear on the input shaft, why it ever needs to come
out.. I don't know? you can get rollers in or out with it in place..!
I'm going to glassbead and wash the case, photograph some parts of the case that can screw up a transmission,
wire wheel all the gears etc.. and then post some more in the second part of
this process..
John Barton
Home
John Barton's T84 G/Box 2
3
g503.com |