|
RESTORATION (2)
Tools, Accessories, Instruments
As I do pieces and parts up for the GPW, I'll be adding photos
to this section.
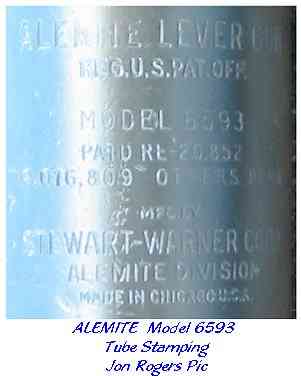
ALEMITE Model 6593 Lever
Grease Gun
I was very pleased with the way the Grease Gun turned
out, the small dings and scrapes were left on, after all this isn't an NOS
 part,
and saw use before I laid my hands on it, and, as usual, I sent the parts
to Al for plating, and it turned up in the same carton as the Waltham and
Schrader Gauge. After awhile the brightness of the plating will settle down to a
more respectable sheen. part,
and saw use before I laid my hands on it, and, as usual, I sent the parts
to Al for plating, and it turned up in the same carton as the Waltham and
Schrader Gauge. After awhile the brightness of the plating will settle down to a
more respectable sheen.
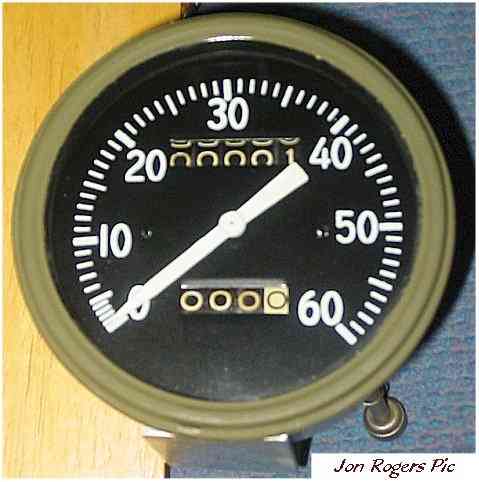
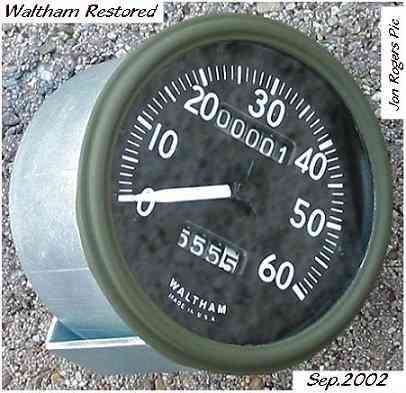
SPEEDOMETER ( Updated
11.Sep.2002)
Although it looks brand new today, this speedo was picked up at the 1999 Brisbane
MV Swap meeting for AU$20, basically, just parts in a shoe box, broken
glass, missing numbers on the reels, the face was almost gone, needle was shot
and the case was rusty. I began by sending off the case to be replated in
Bundaberg, when I got it back AU$25 poorer, I was disappointed with the result.
I asked Al Brass if he knew anyone in New Zealand I could trust to do the work,
and he suggested his electroplater, so as Al would be in Brisbane for a business
conference, I drove to Brisbane with Patch on a Sunday and spent the day with
Al, giving him my speedo, ( or as it was then , a box of parts) and the innards
of a Waltham sent to me from Mike over in South Australia. (Al's Waltham had
problems with the magnet and needed a replacement and Mike had somehow found
one) I never saw the speedo again for several months until I went over to see Al
in New Zealand in November 2001. Just
 seeing the speedo
all restored, added icing to the cake of seeing Al and playing with his jeep for
ten days. The cost of re-screening the face, having the innards gone over by
Parrott's in Christchurch, Al spending countless hours doing me a big favour, cost
me no more than a later model incorrect one., so in my opinion it's well worth
restoring an original if possible, provided you can get it a good price to begin
with, and have a good mate willing to do BIG favours, Thanks Al. that's another
one I owe you. If you want more information on Speedos go to Sean Elliott's Home
Page section on
Speedo's and
Gauges seeing the speedo
all restored, added icing to the cake of seeing Al and playing with his jeep for
ten days. The cost of re-screening the face, having the innards gone over by
Parrott's in Christchurch, Al spending countless hours doing me a big favour, cost
me no more than a later model incorrect one., so in my opinion it's well worth
restoring an original if possible, provided you can get it a good price to begin
with, and have a good mate willing to do BIG favours, Thanks Al. that's another
one I owe you. If you want more information on Speedos go to Sean Elliott's Home
Page section on
Speedo's and
Gauges
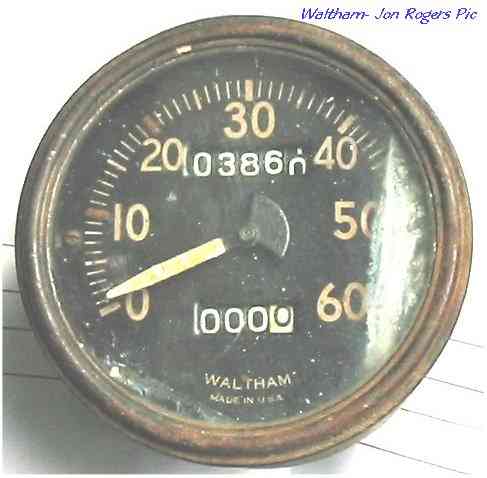
UPDATE 18 JUNE 2002
I managed to find a Waltham speedometer on the 15 June at the
bargain basement price of $19.99 ( love that 99c).a full cent cheaper than the
box of parts on the Speedo above. As soon
 as
I can discern whether or not it's restorable, and there's no reason to
believe it's not, I'll probably sell off the Moto-Meter Speedometer to
one of my friends at a good price, probably the cost of the restoration
plus the initial cost of AU$20. I hope to have restoration pics of the
Waltham here as soon as it's
finished. as
I can discern whether or not it's restorable, and there's no reason to
believe it's not, I'll probably sell off the Moto-Meter Speedometer to
one of my friends at a good price, probably the cost of the restoration
plus the initial cost of AU$20. I hope to have restoration pics of the
Waltham here as soon as it's
finished.
UPDATE - MOTO-METER SPEEDO SOLD, actually swapped for parts to a good
mate. :^)
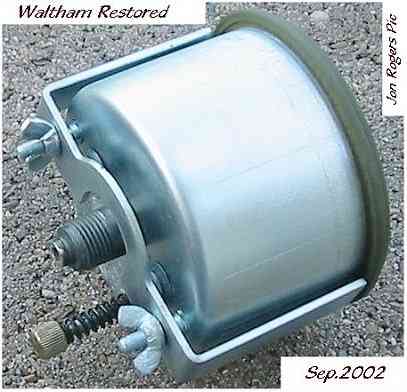
The Waltham After
Restoration
The two lower photos are of the same Waltham after
restoration. Again thanks goes to Alasdair Brass in New Zealand who looked after
the speedo, sent the case to be replated, arranged Parrott's in Christchurch to
strip down and
 refurbish
the workings. Al painted the bezel and made the missing bracket which holds the
speedo in behind the dash using his Waltham bracket as a template. This has been
well worth the wait and the small amount of money involved. The slight mottled
appearance on the face of the speedo is a reflection. refurbish
the workings. Al painted the bezel and made the missing bracket which holds the
speedo in behind the dash using his Waltham bracket as a template. This has been
well worth the wait and the small amount of money involved. The slight mottled
appearance on the face of the speedo is a reflection.
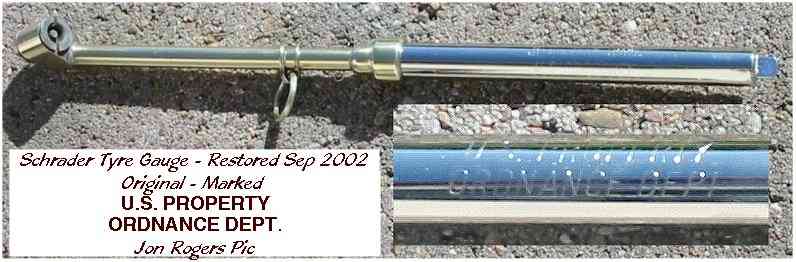
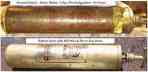
SCHRADER
GAUGE
I sent Alasdair Brass my old Schrader tyre gauge tube and indicator arm to
have the old
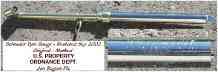 nickel
plate stripped off and re-nickel plated, this was returned along with the speedo. In the meantime
I had cleaned up the brass parts, as someone in the past had used it as a
hammer, there was also a slight curve in the brass tube, this was easily
straightened, and cleaned up. Thanks again Al. nickel
plate stripped off and re-nickel plated, this was returned along with the speedo. In the meantime
I had cleaned up the brass parts, as someone in the past had used it as a
hammer, there was also a slight curve in the brass tube, this was easily
straightened, and cleaned up. Thanks again Al.
Bob Notman has a good section on his
Home Page
which shows the
Schrader Gauge in cross section
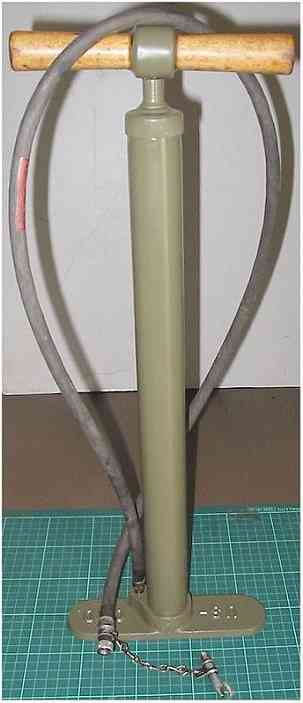
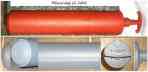
TYRE PUMP
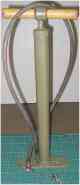 I
purchased this pump off EBay for the princely sum of US$25, still with the
original Olive Drab paint ( some are grey) it had an original hose fitted
but perished, so I I
purchased this pump off EBay for the princely sum of US$25, still with the
original Olive Drab paint ( some are grey) it had an original hose fitted
but perished, so I
 emailed
Ron Fitzpatrick
who sells not only the hoses
but also they come with the attached nozzle. On inspection of the reproduction I
received from Ron, I was highly impressed that it matched the original in every
respect. However, I was a bit disappointed when the pump arrived, one end
had been bent up at an angle of around 15 -20 degrees. Not wanting to straighten
it out cold, and knowing it's cast steel, I heated the offending foot with a
propane torch, and slowly squeezed it straight in the vice jaws, it came back
exactly where it was meant to be... that called for a beer.( well...the day was
hot!). Next problem was the leather washer, a good mate of mine ( funny how we
rely on friends in this hobby/passion) who's a boot maker by trade, my immediate
thought was I'd just get the leather off him and play around with it a little,
he wouldn't hear of it, and right here and then asked that I bring in the pump
for him to measure and fit a new washer. Apparently he had done one just the
week before for a vintage car pump, and knew exactly what to do. The first tip
he gave me was to chamfer the edge back, about 3/16", to half the thickness of
the 1/8" leather, a grinder/buffer will do the trick, have a central hole that's
a good fit to the shaft, next wet the leather thoroughly. Fitting the washer
upside down on the shaft i.e.;- chamfer down, push the shaft , washer fitted,
into the tube, making sure the edge is even all around, screw down the cap and
leave it for a day or so. When you remove the shaft after that period, turn the
washer over, refit it to the shaft, and you'll find it will slide into the tube
without any problems. A little light oil will keep the tube in good condition
internally, some dubbin on the leather and the pump should last a lifetime. The
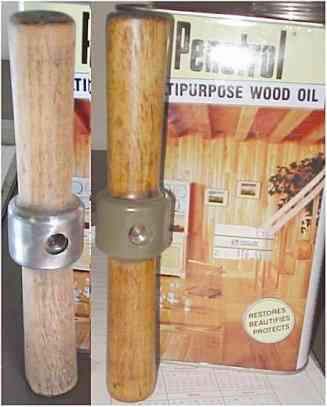
wooden handle was rubbed down with 400 grade sandpaper, and 3 coats of Penetrol
Wood oil applied with a rag. This gives you an excellent satin finish with a
smooth feel. emailed
Ron Fitzpatrick
who sells not only the hoses
but also they come with the attached nozzle. On inspection of the reproduction I
received from Ron, I was highly impressed that it matched the original in every
respect. However, I was a bit disappointed when the pump arrived, one end
had been bent up at an angle of around 15 -20 degrees. Not wanting to straighten
it out cold, and knowing it's cast steel, I heated the offending foot with a
propane torch, and slowly squeezed it straight in the vice jaws, it came back
exactly where it was meant to be... that called for a beer.( well...the day was
hot!). Next problem was the leather washer, a good mate of mine ( funny how we
rely on friends in this hobby/passion) who's a boot maker by trade, my immediate
thought was I'd just get the leather off him and play around with it a little,
he wouldn't hear of it, and right here and then asked that I bring in the pump
for him to measure and fit a new washer. Apparently he had done one just the
week before for a vintage car pump, and knew exactly what to do. The first tip
he gave me was to chamfer the edge back, about 3/16", to half the thickness of
the 1/8" leather, a grinder/buffer will do the trick, have a central hole that's
a good fit to the shaft, next wet the leather thoroughly. Fitting the washer
upside down on the shaft i.e.;- chamfer down, push the shaft , washer fitted,
into the tube, making sure the edge is even all around, screw down the cap and
leave it for a day or so. When you remove the shaft after that period, turn the
washer over, refit it to the shaft, and you'll find it will slide into the tube
without any problems. A little light oil will keep the tube in good condition
internally, some dubbin on the leather and the pump should last a lifetime. The
wooden handle was rubbed down with 400 grade sandpaper, and 3 coats of Penetrol
Wood oil applied with a rag. This gives you an excellent satin finish with a
smooth feel.
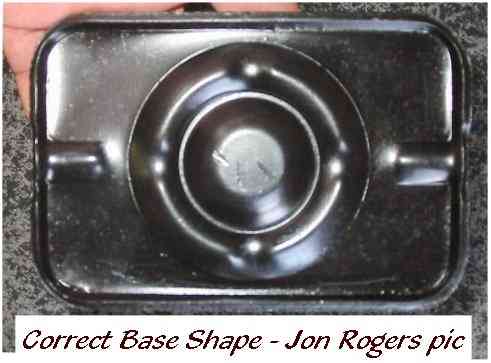
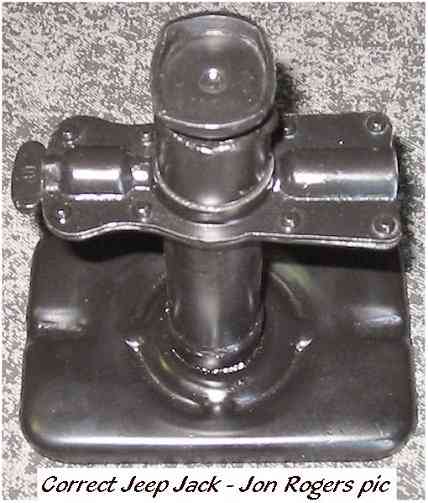
SCREW JACK
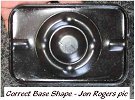 One of the hardest parts to find is the jeep jack,
or so "they" say, but persistence paid off big time one day when I found a One of the hardest parts to find is the jeep jack,
or so "they" say, but persistence paid off big time one day when I found a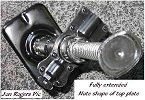 few
by accident, again on EBay. I typed in screw, jack, got about 50 hits, and
as I had nothing better to do a the time, went through each one, very time
consuming as most sellers know nothing about cropping photos, well thank
goodness for that. One particular photo was taking so long I was about to give
up and look at the next item, but instead decided to go make a coffee while it
downloaded. This auction was listed as a jack screw handle reflector, with no
commas , turned out to be a screw jack, a handle and a safety reflector. Way
down the bottom of the pic was this jack, so after winning, and emails were
exchanged with the seller, I asked if he few
by accident, again on EBay. I typed in screw, jack, got about 50 hits, and
as I had nothing better to do a the time, went through each one, very time
consuming as most sellers know nothing about cropping photos, well thank
goodness for that. One particular photo was taking so long I was about to give
up and look at the next item, but instead decided to go make a coffee while it
downloaded. This auction was listed as a jack screw handle reflector, with no
commas , turned out to be a screw jack, a handle and a safety reflector. Way
down the bottom of the pic was this jack, so after winning, and emails were
exchanged with the seller, I asked if he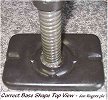
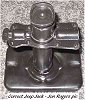 had anymore of these jacks, I nearly
fell over when he said he had another exactly the same and I could have it for
the same price as the other one... US$6.00.and that included postage.. Thank you
very much. The only restoration required was a light
clean and touch up with Satin finish Black. The extra jack?. .that's what
friends are for, now two people are happy.
Some days are diamonds, some days are stone, that day was a double diamond. had anymore of these jacks, I nearly
fell over when he said he had another exactly the same and I could have it for
the same price as the other one... US$6.00.and that included postage.. Thank you
very much. The only restoration required was a light
clean and touch up with Satin finish Black. The extra jack?. .that's what
friends are for, now two people are happy.
Some days are diamonds, some days are stone, that day was a double diamond.
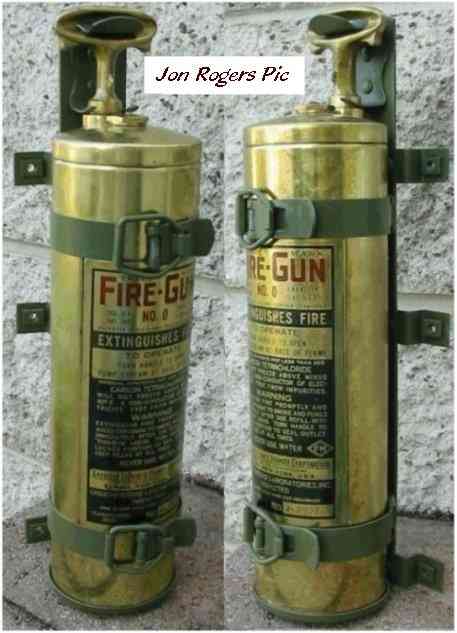
FIRE EXTINGUISHER

I had searched high and low looking for a good dent free Fire
Extinguisher, managed to get this one off EBay for US$13, postage here to
Australia cost more at US$16, considering that if you look in EBay under MB GPW
you'll be lucky to get one under US$50... but.. if you "Search" for Brass Fire
Extinguisher they can be picked up at a third the cost. Most people who argue
that EBay isn't that good, just don't know where or how to look. And complain
when jeep part prices go through the roof. This one came without a mounting
bracket or the three "stand offs". I made the "stand offs" using my JeepDraw
drawings and the bracket was a combination of an old bracket and drawings I had
done up of an original. As you can see this is for a late model jeep, having the
two straps, made again from my drawings. I found that 3/4" carton bonding steel,
is the right size, easy to work and inexpensive, derived free from the local
hardware shop from some throw away piles that had accumulated. Total time taken
to manufacture the two straps and clips was something like a Saturday afternoon.
Almost all Fire Extinguishers are painted OD, some were left natural Brass, I
prefer this look. I won't enter into an argument what's correct or incorrect. It
would seem that the acceptable Fire Extinguishers for the jeep are Fire-Gun,
Pyrene( Heavy Vehicle), Quick Aid, S.O.S. Fire Guard, there's no evidence that
Ford jeeps had Ford fire extinguishers, It's listed in the Emile Becker and Guy
Dentzer book Page 166, but this doesn't necessarily make it correct, if someone
has solid evidence to that effect, please let me know, then I can kick myself
for giving away a perfectly good Ford plate.
GAUGES
  The picture on the left is the of the restored Stewart Warner
Fuel Gauge, now fitted with the correct length and width indicator. Again Al
came to the rescue, this gauge would still be sitting in a box up in the shed,
patiently waiting for me to figure out where to start. On the right side is of
three gauges as I found them, the Oil Pressure gauge is NOS, from Frank, the AMP gauge
requires a lot of work and is still in New Zealand awaiting the two basic
requirements - Time and Money. I still have to find a restorable Temperature
gauge with the correct Ford flat binding on the capillary tube. The picture on the left is the of the restored Stewart Warner
Fuel Gauge, now fitted with the correct length and width indicator. Again Al
came to the rescue, this gauge would still be sitting in a box up in the shed,
patiently waiting for me to figure out where to start. On the right side is of
three gauges as I found them, the Oil Pressure gauge is NOS, from Frank, the AMP gauge
requires a lot of work and is still in New Zealand awaiting the two basic
requirements - Time and Money. I still have to find a restorable Temperature
gauge with the correct Ford flat binding on the capillary tube.
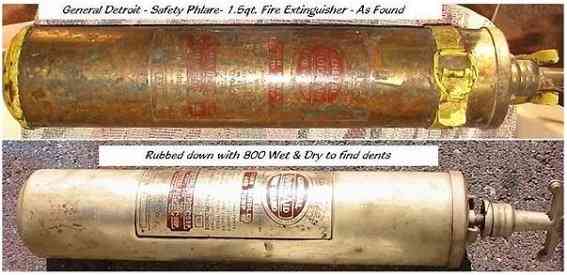
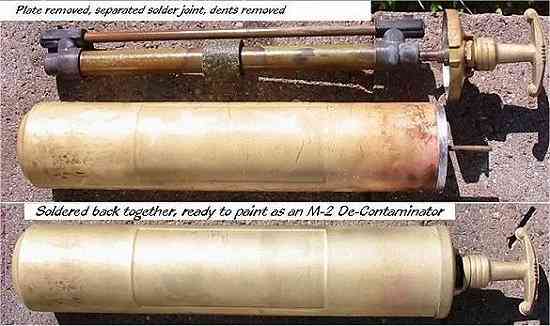
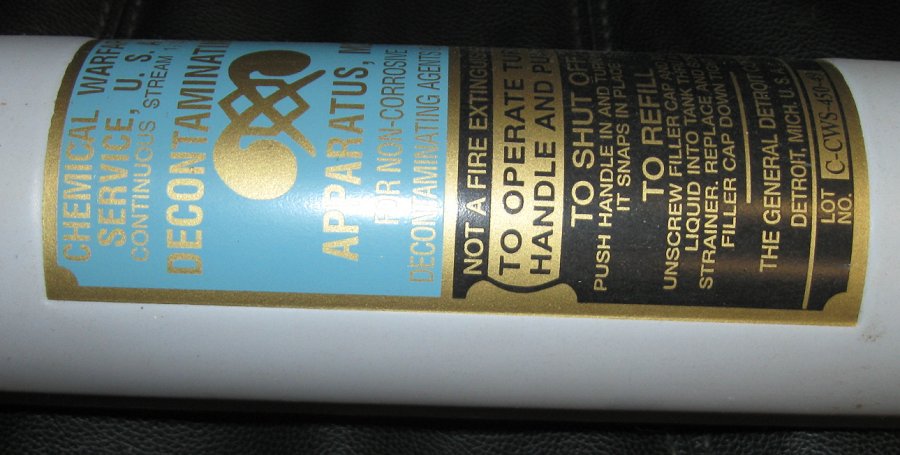
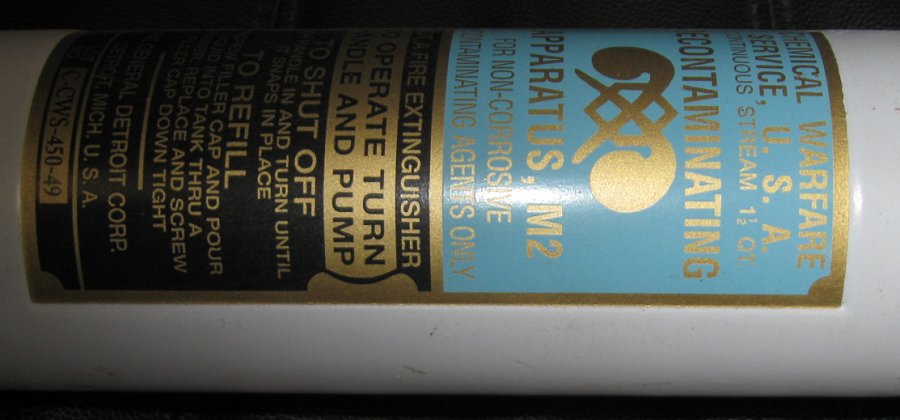
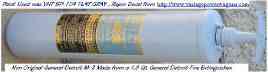
My Reproduction M-2 DE-CONTAMINATOR
Having the desire to own an M-2 De-Contaminator for my '44 GPW and
insufficient funds available for an original, I
decided to make my own using a General Detroit 1.5 quart Fire Extinguisher and a
reproduction decal from
http://www.vintagepowerwagons.com I was
told that the original had a bluish gray colour, with a flat finish. I found
that VHT high
temperature paint sold in Auto Parts stores is very close to the finish and
colour I needed. The number is SP-104 FLAT GRAY. I purchased the fire
extinguished off EBay for around US$20, this included the bracket, the paint was
expensive at AU$14.95 for an 11 oz. rattle can. I rubbed the exterior down with
800 grade wet and dry to highlight all the dents and dings, removed the top,
using a round wood dolly, took out the dents then re-soldered the top. Having
primed the fire extinguisher , a light rub down with 400 grade, sprayed with the
rattle can of VHT and applied the decal. So easy!.
PLEASE NOTE
If you're considering making your own M-2
De-contaminator, be aware that the indention on the Model 95 HD Quick-Aid 1.5
quart General Detroit Pump is only 2.5" x 5" and the label is
3" x 6". Info. supplied by David Cyphers
See
NOS Section
3 for Original M-2 Pics


Home
Restoration 1
3
4
g503.com
|